Search Results: "mkd"

20 September 2022

Simon Josefsson: Privilege separation of GSS-API credentials for Apache

To protect web resources with Kerberos you may use Apache HTTPD with mod_auth_gssapi however, all web scripts (e.g., PHP) run under Apache will have access to the Kerberos long-term symmetric secret credential (keytab). If someone can get it, they can impersonate your server, which is bad. The gssproxy project makes it possible to introduce privilege separation to reduce the attack surface. There is a tutorial for RPM-based distributions (Fedora, RHEL, AlmaLinux, etc), but I wanted to get this to work on a DPKG-based distribution (Debian, Ubuntu, Trisquel, PureOS, etc) and found it worthwhile to document the process. I m using Ubuntu 22.04 below, but have tested it on Debian 11 as well. I have adopted the gssproxy package in Debian, and testing this setup is part of the scripted autopkgtest/debci regression testing. First install the required packages:
root@foo:~# apt-get update
root@foo:~# apt-get install -y apache2 libapache2-mod-auth-gssapi gssproxy curl
This should give you a working and running web server. Verify it is operational under the proper hostname, I ll use foo.sjd.se in this writeup.
root@foo:~# curl --head http://foo.sjd.se/
HTTP/1.1 200 OK
The next step is to create a keytab containing the Kerberos V5 secrets for your host, the exact steps depends on your environment (usually kadmin ktadd or ipa-getkeytab), but use the string HTTP/foo.sjd.se and then confirm using something like the following.
root@foo:~# ls -la /etc/gssproxy/httpd.keytab
-rw------- 1 root root 176 Sep 18 06:44 /etc/gssproxy/httpd.keytab
root@foo:~# klist -k /etc/gssproxy/httpd.keytab -e
Keytab name: FILE:/etc/gssproxy/httpd.keytab
KVNO Principal
---- --------------------------------------------------------------------------
   2 HTTP/foo.sjd.se@GSSPROXY.EXAMPLE.ORG (aes256-cts-hmac-sha1-96) 
   2 HTTP/foo.sjd.se@GSSPROXY.EXAMPLE.ORG (aes128-cts-hmac-sha1-96) 
root@foo:~# 
The file should be owned by root and not be in the default /etc/krb5.keytab location, so Apache s libapache2-mod-auth-gssapi will have to use gssproxy to use it.

Then configure gssproxy to find the credential and use it with Apache.
root@foo:~# cat<<EOF > /etc/gssproxy/80-httpd.conf
[service/HTTP]
mechs = krb5
cred_store = keytab:/etc/gssproxy/httpd.keytab
cred_store = ccache:/var/lib/gssproxy/clients/krb5cc_%U
euid = www-data
process = /usr/sbin/apache2
EOF
For debugging, it may be useful to enable more gssproxy logging:
root@foo:~# cat<<EOF > /etc/gssproxy/gssproxy.conf
[gssproxy]
debug_level = 1
EOF
root@foo:~#
Restart gssproxy so it finds the new configuration, and monitor syslog as follows:
root@foo:~# tail -F /var/log/syslog &
root@foo:~# systemctl restart gssproxy
You should see something like this in the log file:
Sep 18 07:03:15 foo gssproxy[4076]: [2022/09/18 05:03:15]: Exiting after receiving a signal
Sep 18 07:03:15 foo systemd[1]: Stopping GSSAPI Proxy Daemon
Sep 18 07:03:15 foo systemd[1]: gssproxy.service: Deactivated successfully.
Sep 18 07:03:15 foo systemd[1]: Stopped GSSAPI Proxy Daemon.
Sep 18 07:03:15 foo gssproxy[4092]: [2022/09/18 05:03:15]: Debug Enabled (level: 1)
Sep 18 07:03:15 foo systemd[1]: Starting GSSAPI Proxy Daemon
Sep 18 07:03:15 foo gssproxy[4093]: [2022/09/18 05:03:15]: Kernel doesn't support GSS-Proxy (can't open /proc/net/rpc/use-gss-proxy: 2 (No such file or directory))
Sep 18 07:03:15 foo gssproxy[4093]: [2022/09/18 05:03:15]: Problem with kernel communication! NFS server will not work
Sep 18 07:03:15 foo systemd[1]: Started GSSAPI Proxy Daemon.
Sep 18 07:03:15 foo gssproxy[4093]: [2022/09/18 05:03:15]: Initialization complete.
The NFS-related errors is due to a default gssproxy configuration file, it is harmless and if you don t use NFS with GSS-API you can silence it like this:
root@foo:~# rm /etc/gssproxy/24-nfs-server.conf
root@foo:~# systemctl try-reload-or-restart gssproxy
The log should now indicate that it loaded the keytab:
Sep 18 07:18:59 foo systemd[1]: Reloading GSSAPI Proxy Daemon 
Sep 18 07:18:59 foo gssproxy[4182]: [2022/09/18 05:18:59]: Received SIGHUP; re-reading config.
Sep 18 07:18:59 foo gssproxy[4182]: [2022/09/18 05:18:59]: Service: HTTP, Keytab: /etc/gssproxy/httpd.keytab, Enctype: 18
Sep 18 07:18:59 foo gssproxy[4182]: [2022/09/18 05:18:59]: New config loaded successfully.
Sep 18 07:18:59 foo systemd[1]: Reloaded GSSAPI Proxy Daemon.
To instruct Apache or actually, the MIT Kerberos V5 GSS-API library used by mod_auth_gssap loaded by Apache to use gssproxy instead of using /etc/krb5.keytab as usual, Apache needs to be started in an environment that has GSS_USE_PROXY=1 set. The background is covered by the gssproxy-mech(8) man page and explained by the gssproxy README.

When systemd is used the following can be used to set the environment variable, note the final command to reload systemd.
root@foo:~# mkdir -p /etc/systemd/system/apache2.service.d
root@foo:~# cat<<EOF > /etc/systemd/system/apache2.service.d/gssproxy.conf
[Service]
Environment=GSS_USE_PROXY=1
EOF
root@foo:~# systemctl daemon-reload
The next step is to configure a GSS-API protected Apache resource:
root@foo:~# cat<<EOF > /etc/apache2/conf-available/private.conf
<Location /private>
  AuthType GSSAPI
  AuthName "GSSAPI Login"
  Require valid-user
</Location>
Enable the configuration and restart Apache the suggested use of reload is not sufficient, because then it won t be restarted with the newly introduced GSS_USE_PROXY variable. This just applies to the first time, after the first restart you may use reload again.
root@foo:~# a2enconf private
Enabling conf private.
To activate the new configuration, you need to run:
systemctl reload apache2
root@foo:~# systemctl restart apache2
When you have debug messages enabled, the log may look like this:
Sep 18 07:32:23 foo systemd[1]: Stopping The Apache HTTP Server 
Sep 18 07:32:23 foo gssproxy[4182]: [2022/09/18 05:32:23]: Client [2022/09/18 05:32:23]: (/usr/sbin/apache2) [2022/09/18 05:32:23]: connected (fd = 10)[2022/09/18 05:32:23]: (pid = 4651) (uid = 0) (gid = 0)[2022/09/18 05:32:23]:
Sep 18 07:32:23 foo gssproxy[4182]: message repeated 4 times: [ [2022/09/18 05:32:23]: Client [2022/09/18 05:32:23]: (/usr/sbin/apache2) [2022/09/18 05:32:23]: connected (fd = 10)[2022/09/18 05:32:23]: (pid = 4651) (uid = 0) (gid = 0)[2022/09/18 05:32:23]:]
Sep 18 07:32:23 foo systemd[1]: apache2.service: Deactivated successfully.
Sep 18 07:32:23 foo systemd[1]: Stopped The Apache HTTP Server.
Sep 18 07:32:23 foo systemd[1]: Starting The Apache HTTP Server
Sep 18 07:32:23 foo gssproxy[4182]: [2022/09/18 05:32:23]: Client [2022/09/18 05:32:23]: (/usr/sbin/apache2) [2022/09/18 05:32:23]: connected (fd = 10)[2022/09/18 05:32:23]: (pid = 4657) (uid = 0) (gid = 0)[2022/09/18 05:32:23]:
root@foo:~# Sep 18 07:32:23 foo gssproxy[4182]: message repeated 8 times: [ [2022/09/18 05:32:23]: Client [2022/09/18 05:32:23]: (/usr/sbin/apache2) [2022/09/18 05:32:23]: connected (fd = 10)[2022/09/18 05:32:23]: (pid = 4657) (uid = 0) (gid = 0)[2022/09/18 05:32:23]:]
Sep 18 07:32:23 foo systemd[1]: Started The Apache HTTP Server.
Finally, set up a dummy test page on the server:
root@foo:~# echo OK > /var/www/html/private
To verify that the server is working properly you may acquire tickets locally and then use curl to retrieve the GSS-API protected resource. The "--negotiate" enables SPNEGO and "--user :" asks curl to use username from the environment.
root@foo:~# klist
Ticket cache: FILE:/tmp/krb5cc_0
Default principal: jas@GSSPROXY.EXAMPLE.ORG
Valid starting Expires Service principal
09/18/22 07:40:37 09/19/22 07:40:37 krbtgt/GSSPROXY.EXAMPLE.ORG@GSSPROXY.EXAMPLE.ORG
root@foo:~# curl --negotiate --user : http://foo.sjd.se/private
OK
root@foo:~#
The log should contain something like this:
Sep 18 07:56:00 foo gssproxy[4872]: [2022/09/18 05:56:00]: Client [2022/09/18 05:56:00]: (/usr/sbin/apache2) [2022/09/18 05:56:00]: connected (fd = 10)[2022/09/18 05:56:00]: (pid = 5042) (uid = 33) (gid = 33)[2022/09/18 05:56:00]:
Sep 18 07:56:00 foo gssproxy[4872]: [CID 10][2022/09/18 05:56:00]: gp_rpc_execute: executing 6 (GSSX_ACQUIRE_CRED) for service "HTTP", euid: 33,socket: (null)
Sep 18 07:56:00 foo gssproxy[4872]: [CID 10][2022/09/18 05:56:00]: gp_rpc_execute: executing 1 (GSSX_INDICATE_MECHS) for service "HTTP", euid: 33,socket: (null)
Sep 18 07:56:00 foo gssproxy[4872]: [CID 10][2022/09/18 05:56:00]: gp_rpc_execute: executing 6 (GSSX_ACQUIRE_CRED) for service "HTTP", euid: 33,socket: (null)
Sep 18 07:56:00 foo gssproxy[4872]: [CID 10][2022/09/18 05:56:00]: gp_rpc_execute: executing 9 (GSSX_ACCEPT_SEC_CONTEXT) for service "HTTP", euid: 33,socket: (null)
The Apache log will look like this, notice the authenticated username shown.
127.0.0.1 - jas@GSSPROXY.EXAMPLE.ORG [18/Sep/2022:07:56:00 +0200] "GET /private HTTP/1.1" 200 481 "-" "curl/7.81.0"
Congratulations, and happy hacking!

13 September 2022

Alberto Garc a: Adding software to the Steam Deck with systemd-sysext

Yakuake on SteamOS Introduction: an immutable OS The Steam Deck runs SteamOS, a single-user operating system based on Arch Linux. Although derived from a standard package-based distro, the OS in the Steam Deck is immutable and system updates replace the contents of the root filesystem atomically instead of using the package manager. An immutable OS makes the system more stable and its updates less error-prone, but users cannot install additional packages to add more software. This is not a problem for most users since they are only going to run Steam and its games (which are stored in the home partition). Nevertheless, the OS also has a desktop mode which provides a standard Linux desktop experience, and here it makes sense to be able to install more software. How to do that though? It is possible for the user to become root, make the root filesytem read-write and install additional software there, but any changes will be gone after the next OS update. Modifying the rootfs can also be dangerous if the user is not careful. Ways to add additional software The simplest and safest way to install additional software is with Flatpak, and that s the method recommended in the Steam Deck Desktop FAQ. Flatpak is already installed and integrated in the system via the Discover app so I won t go into more details here. However, while Flatpak works great for desktop applications not every piece of software is currently available, and Flatpak is also not designed for other types of programs like system services or command-line tools. Fortunately there are several ways to add software to the Steam Deck without touching the root filesystem, each one with different pros and cons. I will probably talk about some of them in the future, but in this post I m going to focus on one that is already available in the system: systemd-sysext. About systemd-sysext This is a tool included in recent versions of systemd and it is designed to add additional files (in the form of system extensions) to an otherwise immutable root filesystem. Each one of these extensions contains a set of files. When extensions are enabled (aka merged ) those files will appear on the root filesystem using overlayfs. From then on the user can open and run them normally as if they had been installed with a package manager. Merged extensions are seamlessly integrated with the rest of the OS. Since extensions are just collections of files they can be used to add new applications but also other things like system services, development tools, language packs, etc. Creating an extension: yakuake I m using yakuake as an example for this tutorial since the extension is very easy to create, it is an application that some users are demanding and is not easy to distribute with Flatpak. So let s create a yakuake extension. Here are the steps: 1) Create a directory and unpack the files there:
$ mkdir yakuake
$ wget https://steamdeck-packages.steamos.cloud/archlinux-mirror/extra/os/x86_64/yakuake-21.12.1-1-x86_64.pkg.tar.zst
$ tar -C yakuake -xaf yakuake-*.tar.zst usr
2) Create a file called extension-release.NAME under usr/lib/extension-release.d with the fields ID and VERSION_ID taken from the Steam Deck s /etc/os-release file.
$ mkdir -p yakuake/usr/lib/extension-release.d/
$ echo ID=steamos > yakuake/usr/lib/extension-release.d/extension-release.yakuake
$ echo VERSION_ID=3.3.1 >> yakuake/usr/lib/extension-release.d/extension-release.yakuake
3) Create an image file with the contents of the extension:
$ mksquashfs yakuake yakuake.raw
That s it! The extension is ready. A couple of important things: image files must have the .raw suffix and, despite the name, they can contain any filesystem that the OS can mount. In this example I used SquashFS but other alternatives like EroFS or ext4 are equally valid. NOTE: systemd-sysext can also use extensions from plain directories (i.e skipping the mksquashfs part). Unfortunately we cannot use them in our case because overlayfs does not work with the casefold feature that is enabled on the Steam Deck. Using the extension Once the extension is created you simply need to copy it to a place where systemd-systext can find it. There are several places where they can be installed (see the manual for a list) but due to the Deck s partition layout and the potentially large size of some extensions it probably makes more sense to store them in the home partition and create a link from one of the supported locations (/var/lib/extensions in this example):
(deck@steamdeck ~)$ mkdir extensions
(deck@steamdeck ~)$ scp user@host:/path/to/yakuake.raw extensions/
(deck@steamdeck ~)$ sudo ln -s $PWD/extensions /var/lib/extensions
Once the extension is installed in that directory you only need to enable and start systemd-sysext:
(deck@steamdeck ~)$ sudo systemctl enable systemd-sysext
(deck@steamdeck ~)$ sudo systemctl start systemd-sysext
After this, if everything went fine you should be able to see (and run) /usr/bin/yakuake. The files should remain there from now on, also if you reboot the device. You can see what extensions are enabled with this command:
$ systemd-sysext status
HIERARCHY EXTENSIONS SINCE
/opt      none       -
/usr      yakuake    Tue 2022-09-13 18:21:53 CEST
If you add or remove extensions from the directory then a simple systemd-sysext refresh is enough to apply the changes. Unfortunately, and unlike distro packages, extensions don t have any kind of post-installation hooks or triggers, so in the case of Yakuake you probably won t see an entry in the KDE application menu immediately after enabling the extension. You can solve that by running kbuildsycoca5 once from the command line. Limitations and caveats Using systemd extensions is generally very easy but there are some things that you need to take into account:
  1. Using extensions is easy (you put them in the directory and voil !). However, creating extensions is not necessarily always easy. To begin with, any libraries, files, etc., that your extensions may need should be either present in the root filesystem or provided by the extension itself. You may need to combine files from different sources or packages into a single extension, or compile them yourself.
  2. In particular, if the extension contains binaries they should probably come from the Steam Deck repository or they should be built to work with those packages. If you need to build your own binaries then having a SteamOS virtual machine can be handy. There you can install all development files and also test that everything works as expected. One could also create a Steam Deck SDK extension with all the necessary files to develop directly on the Deck
  3. Extensions are not distribution packages, they don t have dependency information and therefore they should be self-contained. They also lack triggers and other features available in packages. For desktop applications I still recommend using a system like Flatpak when possible.
  4. Extensions are tied to a particular version of the OS and, as explained above, the ID and VERSION_ID of each extension must match the values from /etc/os-release. If the fields don t match then the extension will be ignored. This is to be expected because there s no guarantee that a particular extension is going to work with a different version of the OS. This can happen after a system update. In the best case one simply needs to update the extension s VERSION_ID, but in some cases it might be necessary to create the extension again with different/updated files.
  5. Extensions only install files in /usr and /opt. Any other file in the image will be ignored. This can be a problem if a particular piece of software needs files in other directories.
  6. When extensions are enabled the /usr and /opt directories become read-only because they are now part of an overlayfs. They will remain read-only even if you run steamos-readonly disable !!. If you really want to make the rootfs read-write you need to disable the extensions (systemd-sysext unmerge) first.
  7. Unlike Flatpak or Podman (including toolbox / distrobox), this is (by design) not meant to isolate the contents of the extension from the rest of the system, so you should be careful with what you re installing. On the other hand, this lack of isolation makes systemd-sysext better suited to some use cases than those container-based systems.
Conclusion systemd extensions are an easy way to add software (or data files) to the immutable OS of the Steam Deck in a way that is seamlessly integrated with the rest of the system. Creating them can be more or less easy depending on the case, but using them is extremely simple. Extensions are not packages, and systemd-sysext is not a package manager or a general-purpose tool to solve all problems, but if you are aware of its limitations it can be a practical tool. It is also possible to share extensions with other users, but here the usual warning against installing binaries from untrusted sources applies. Use with caution, and enjoy!

2 September 2022

John Goerzen: Dead USB Drives Are Fine: Building a Reliable Sneakernet

OK, you re probably thinking. John, you talk a lot about things like Gopher and personal radios, and now you want to talk about building a reliable network out of USB drives? Well, yes. In fact, I ve already done it.

What is sneakernet? Normally, sneakernet is a sort of tongue-in-cheek reference to using disconnected storage to transport data or messages. By disconnect storage I mean anything like CD-ROMs, hard drives, SD cards, USB drives, and so forth. There are times when loading up 12TB on a device and driving it across town is just faster and easier than using the Internet for the same. And, sometimes you need to get data to places that have no Internet at all. Another reason for sneakernet is security. For instance, if your backup system is online, and your systems being backed up are online, then it could become possible for an attacker to destroy both your primary copy of data and your backups. Or, you might use a dedicated computer with no network connection to do GnuPG (GPG) signing.

What about reliable sneakernet, then? TCP is often considered a reliable protocol. That means that the sending side is generally able to tell if its message was properly received. As with most reliable protocols, we have these components:
  1. After transmitting a piece of data, the sender retains it.
  2. After receiving a piece of data, the receiver sends an acknowledgment (ACK) back to the sender.
  3. Upon receiving the acknowledgment, the sender removes its buffered copy of the data.
  4. If no acknowledgment is received at the sender, it retransmits the data, in case it gets lost in transit.
  5. It reorders any packets that arrive out of order, so that the recipient s data stream is ordered correctly.
Now, a lot of the things I just mentioned for sneakernet are legendarily unreliable. USB drives fail, CD-ROMs get scratched, hard drives get banged up. Think about putting these things in a bicycle bag or airline luggage. Some of them are going to fail. You might think, well, I ll just copy files to a USB drive instead of move them, and once I get them onto the destination machine, I ll delete them from the source. Congratulations! You are a human retransmit algorithm! We should be able to automate this! And we can.

Enter NNCP NNCP is one of those things that almost defies explanation. It is a toolkit for building asynchronous networks. It can use as a carrier: a pipe, TCP network connection, a mounted filesystem (specifically intended for cases like this), and much more. It also supports multi-hop asynchronous routing and asynchronous meshing, but these are beyond the scope of this particular article. NNCP s transports that involve live communication between two hops already had all the hallmarks of being reliable; there was a positive ACK and retransmit. As of version 8.7.0, NNCP s ACKs themselves can also be asynchronous meaning that every NNCP transport can now be reliable. Yes, that s right. Your ACKs can flow over tapes and USB drives if you want them to. I use this for archiving and backups. If you aren t already familiar with NNCP, you might take a look at my NNCP page. I also have a lot of blog posts about NNCP. Those pages describe the basics of NNCP: the packet (the unit of transmission in NNCP, which can be tiny or many TB), the end-to-end encryption, and so forth. The new command we will now be interested in is nncp-ack.

The Basic Idea Here are the basic steps to processing this stuff with NNCP:
  1. First, we use nncp-xfer -rx to process incoming packets from the USB (or other media) device. This moves them into the NNCP inbound queue, deleting them from the media device, and verifies the packet integrity.
  2. We use nncp-ack -node $NODE to create ACK packets responding to the packets we just loaded into the rx queue. It writes a list of generated ACKs onto fd 4, which we save off for later use.
  3. We run nncp-toss -seen to process the incoming queue. The use of -seen causes NNCP to remember the hashes of packets seen before, so a duplicate of an already-seen packet will not be processed twice. This command also processes incoming ACKs for packets we ve sent out previously; if they pass verification, the relevant packets are removed from the local machine s tx queue.
  4. Now, we use nncp-xfer -keep -tx -mkdir -node $NODE to send outgoing packets to a given node by writing them to a given directory on the media device. -keep causes them to remain in the outgoing queue.
  5. Finally, we use the list of generated ACK packets saved off in step 2 above. That list is passed to nncp-rm -node $NODE -pkt < $FILE to remove those specific packets from the outbound queue. The reason is that there will never be an ACK of ACK packet (that would create an infinite loop), so if we don t delete them in this manner, they would hang around forever.
You can see these steps follow the same basic outline on upstream s nncp-ack page. One thing to keep in mind: if anything else is running nncp-toss, there is a chance of a race condition between steps 1 and 2 (if nncp-toss gets to it first, it might not get an ack generated). This would sort itself out eventually, presumably, as the sender would retransmit and it would be ACKed later.

Further ideas NNCP guarantees the integrity of packets, but not ordering between packets; if you need that, you might look into my Filespooler program. It is designed to work with NNCP and can provide ordered processing.

An example script Here is a script you might try for this sort of thing. It may have more logic than you need really, you just need the steps above but hopefully it is clear.
#!/bin/bash
set -eo pipefail
MEDIABASE="/media/$USER"
# The local node name
NODENAME=" hostname "
# All nodes.  NODENAME should be in this list.
ALLNODES="node1 node2 node3"
RUNNNCP=""
# If you need to sudo, use something like RUNNNCP="sudo -Hu nncp"
NNCPPATH="/usr/local/nncp/bin"
ACKPATH=" mktemp -d "
# Process incoming packets.
#
# Parameters: $1 - the path to scan.  Must contain a directory
# named "nncp".
procrxpath ()  
    while [ -n "$1" ]; do
        BASEPATH="$1/nncp"
        shift
        if ! [ -d "$BASEPATH" ]; then
            echo "$BASEPATH doesn't exist; skipping"
            continue
        fi
        echo " *** Incoming: processing $BASEPATH"
        TMPDIR=" mktemp -d "
        # This rsync and the one below can help with
        # certain permission issues from weird foreign
        # media.  You could just eliminate it and
        # always use $BASEPATH instead of $TMPDIR below.
        rsync -rt "$BASEPATH/" "$TMPDIR/"
        # You may need these next two lines if using sudo as above.
        # chgrp -R nncp "$TMPDIR"
        # chmod -R g+rwX "$TMPDIR"
        echo "     Running nncp-xfer -rx"
        $RUNNNCP $NNCPPATH/nncp-xfer -progress -rx "$TMPDIR"
        for NODE in $ALLNODES; do
                if [ "$NODE" != "$NODENAME" ]; then
                        echo "     Running nncp-ack for $NODE"
                        # Now, we generate ACK packets for each node we will
                        # process.  nncp-ack writes a list of the created
                        # ACK packets to fd 4.  We'll use them later.
                        # If using sudo, add -C 5 after $RUNNNCP.
                        $RUNNNCP $NNCPPATH/nncp-ack -progress -node "$NODE" \
                           4>> "$ACKPATH/$NODE"
                fi
        done
        rsync --delete -rt "$TMPDIR/" "$BASEPATH/"
        rm -fr "$TMPDIR"
    done
 
proctxpath ()  
    while [ -n "$1" ]; do
        BASEPATH="$1/nncp"
        shift
        if ! [ -d "$BASEPATH" ]; then
            echo "$BASEPATH doesn't exist; skipping"
            continue
        fi
        echo " *** Outgoing: processing $BASEPATH"
        TMPDIR=" mktemp -d "
        rsync -rt "$BASEPATH/" "$TMPDIR/"
        # You may need these two lines if using sudo:
        # chgrp -R nncp "$TMPDIR"
        # chmod -R g+rwX "$TMPDIR"
        for DESTHOST in $ALLNODES; do
            if [ "$DESTHOST" = "$NODENAME" ]; then
                continue
            fi
            # Copy outgoing packets to this node, but keep them in the outgoing
            # queue with -keep.
            $RUNNNCP $NNCPPATH/nncp-xfer -keep -tx -mkdir -node "$DESTHOST" -progress "$TMPDIR"
            # Here is the key: that list of ACK packets we made above - now we delete them.
            # There will never be an ACK for an ACK, so they'd keep sending forever
            # if we didn't do this.
            if [ -f "$ACKPATH/$DESTHOST" ]; then
                echo "nncp-rm for node $DESTHOST"
                $RUNNNCP $NNCPPATH/nncp-rm -debug -node "$DESTHOST" -pkt < "$ACKPATH/$DESTHOST"
            fi
        done
        rsync --delete -rt "$TMPDIR/" "$BASEPATH/"
        rm -rf "$TMPDIR"
        # We only want to write stuff once.
        return 0
    done
 
procrxpath "$MEDIABASE"/*
echo " *** Initial tossing..."
# We make sure to use -seen to rule out duplicates.
$RUNNNCP $NNCPPATH/nncp-toss -progress -seen
proctxpath "$MEDIABASE"/*
echo "You can unmount devices now."
echo "Done."

This post is also available on my webiste, where it may be periodically updated.

1 August 2022

Sergio Talens-Oliag: Using Git Server Hooks on GitLab CE to Validate Tags

Since a long time ago I ve been a gitlab-ce user, in fact I ve set it up on three of the last four companies I ve worked for (initially I installed it using the omnibus packages on a debian server but on the last two places I moved to the docker based installation, as it is easy to maintain and we don t need a big installation as the teams using it are small). On the company I work for now (kyso) we are using it to host all our internal repositories and to do all the CI/CD work (the automatic deployments are triggered by web hooks in some cases, but the rest is all done using gitlab-ci). The majority of projects are using nodejs as programming language and we have automated the publication of npm packages on our gitlab instance npm registry and even the publication into the npmjs registry. To publish the packages we have added rules to the gitlab-ci configuration of the relevant repositories and we publish them when a tag is created. As the we are lazy by definition, I configured the system to use the tag as the package version; I tested if the contents of the package.json where in sync with the expected version and if it was not I updated it and did a force push of the tag with the updated file using the following code on the script that publishes the package:
# Update package version & add it to the .build-args
INITIAL_PACKAGE_VERSION="$(npm pkg get version tr -d '"')"
npm version --allow-same --no-commit-hooks --no-git-tag-version \
  "$CI_COMMIT_TAG"
UPDATED_PACKAGE_VERSION="$(npm pkg get version tr -d '"')"
echo "UPDATED_PACKAGE_VERSION=$UPDATED_PACKAGE_VERSION" >> .build-args
# Update tag if the version was updated or abort
if [ "$INITIAL_PACKAGE_VERSION" != "$UPDATED_PACKAGE_VERSION" ]; then
  if [ -n "$CI_GIT_USER" ] && [ -n "$CI_GIT_TOKEN" ]; then
    git commit -m "Updated version from tag $CI_COMMIT_TAG" package.json
    git tag -f "$CI_COMMIT_TAG" -m "Updated version from tag"
    git push -f -o ci.skip origin "$CI_COMMIT_TAG"
  else
    echo "!!! ERROR !!!"
    echo "The updated tag could not be uploaded."
    echo "Set CI_GIT_USER and CI_GIT_TOKEN or fix the 'package.json' file"
    echo "!!! ERROR !!!"
    exit 1
  fi
fi
This feels a little dirty (we are leaving commits on the tag but not updating the original branch); I thought about trying to find the branch using the tag and update it, but I drop the idea pretty soon as there were multiple issues to consider (i.e. we can have tags pointing to commits present in multiple branches and even if it only points to one the tag does not have to be the HEAD of the branch making the inclusion difficult). In any case this system was working, so we left it until we started to publish to the NPM Registry; as we are using a token to push the packages that we don t want all developers to have access to (right now it would not matter, but when the team grows it will) I started to use gitlab protected branches on the projects that need it and adjusting the .npmrc file using protected variables. The problem then was that we can no longer do a standard force push for a branch (that is the main point of the protected branches feature) unless we use the gitlab api, so the tags with the wrong version started to fail. As the way things were being done seemed dirty anyway I thought that the best way of fixing things was to forbid users to push a tag that includes a version that does not match the package.json version. After thinking about it we decided to use githooks on the gitlab server for the repositories that need it, as we are only interested in tags we are going to use the update hook; it is executed once for each ref to be updated, and takes three parameters:
  • the name of the ref being updated,
  • the old object name stored in the ref,
  • and the new object name to be stored in the ref.
To install our hook we have found the gitaly relative path of each repo and located it on the server filesystem (as I said we are using docker and the gitlab s data directory is on /srv/gitlab/data, so the path to the repo has the form /srv/gitlab/data/git-data/repositories/@hashed/xx/yy/hash.git). Once we have the directory we need to:
  • create a custom_hooks sub directory inside it,
  • add the update script (as we only need one script we used that instead of creating an update.d directory, the good thing is that this will also work with a standard git server renaming the base directory to hooks instead of custom_hooks),
  • make it executable, and
  • change the directory and file ownership to make sure it can be read and executed from the gitlab container
On a console session:
$ cd /srv/gitlab/data/git-data/repositories/@hashed/xx/yy/hash.git
$ mkdir custom_hooks
$ edit_or_copy custom_hooks/update
$ chmod 0755 custom_hooks/update
$ chown --reference=. -R custom_hooks
The update script we are using is as follows:
#!/bin/sh
set -e
# kyso update hook
#
# Right now it checks version.txt or package.json versions against the tag name
# (it supports a 'v' prefix on the tag)
# Arguments
ref_name="$1"
old_rev="$2"
new_rev="$3"
# Initial test
if [ -z "$ref_name" ]    [ -z "$old_rev" ]   [ -z "$new_rev" ]; then
  echo "usage: $0 <ref> <oldrev> <newrev>" >&2
  exit 1
fi
# Get the tag short name
tag_name="$ ref_name##refs/tags/ "
# Exit if the update is not for a tag
if [ "$tag_name" = "$ref_name" ]; then
  exit 0
fi
# Get the null rev value (string of zeros)
zero=$(git hash-object --stdin </dev/null   tr '0-9a-f' '0')
# Get if the tag is new or not
if [ "$old_rev" = "$zero" ]; then
  new_tag="true"
else
  new_tag="false"
fi
# Get the type of revision:
# - delete: if the new_rev is zero
# - commit: annotated tag
# - tag: un-annotated tag
if [ "$new_rev" = "$zero" ]; then
  new_rev_type="delete"
else
  new_rev_type="$(git cat-file -t "$new_rev")"
fi
# Exit if we are deleting a tag (nothing to check here)
if [ "$new_rev_type" = "delete" ]; then
  exit 0
fi
# Check the version against the tag (supports version.txt & package.json)
if git cat-file -e "$new_rev:version.txt" >/dev/null 2>&1; then
  version="$(git cat-file -p "$new_rev:version.txt")"
  if [ "$version" = "$tag_name" ]   [ "$version" = "$ tag_name#v " ]; then
    exit 0
  else
    EMSG="tag '$tag_name' and 'version.txt' contents '$version' don't match"
    echo "GL-HOOK-ERR: $EMSG"
    exit 1
  fi
elif git cat-file -e "$new_rev:package.json" >/dev/null 2>&1; then
  version="$(
    git cat-file -p "$new_rev:package.json"   jsonpath version   tr -d '\[\]"'
  )"
  if [ "$version" = "$tag_name" ]   [ "$version" = "$ tag_name#v " ]; then
    exit 0
  else
    EMSG="tag '$tag_name' and 'package.json' version '$version' don't match"
    echo "GL-HOOK-ERR: $EMSG"
    exit 1
  fi
else
  # No version.txt or package.json file found
  exit 0
fi
Some comments about it:
  • we are only looking for tags, if the ref_name does not have the prefix refs/tags/ the script does an exit 0,
  • although we are checking if the tag is new or not we are not using the value (in gitlab that is handled by the protected tag feature),
  • if we are deleting a tag the script does an exit 0, we don t need to check anything in that case,
  • we are ignoring if the tag is annotated or not (we set the new_rev_type to tag or commit, but we don t use the value),
  • we test first the version.txt file and if it does not exist we check the package.json file, if it does not exist either we do an exit 0, as there is no version to check against and we allow that on a tag,
  • we add the GL-HOOK-ERR: prefix to the messages to show them on the gitlab web interface (can be tested creating a tag from it),
  • to get the version on the package.json file we use the jsonpath binary (it is installed by the jsonpath ruby gem) because it is available on the gitlab container (initially I used sed to get the value, but a real JSON parser is always a better option).
Once the hook is installed when a user tries to push a tag to a repository that has a version.txt file or package.json file and the tag does not match the version (if version.txt is present it takes precedence) the push fails. If the tag matches or the files are not present the tag is added if the user has permission to add it in gitlab (our hook is only executed if the user is allowed to create or update the tag).

24 June 2022

Kees Cook: finding binary differences

As part of the continuing work to replace 1-element arrays in the Linux kernel, it s very handy to show that a source change has had no executable code difference. For example, if you started with this:
struct foo  
    unsigned long flags;
    u32 length;
    u32 data[1];
 ;
void foo_init(int count)
 
    struct foo *instance;
    size_t bytes = sizeof(*instance) + sizeof(u32) * (count - 1);
    ...
    instance = kmalloc(bytes, GFP_KERNEL);
    ...
 ;
And you changed only the struct definition:
-    u32 data[1];
+    u32 data[];
The bytes calculation is going to be incorrect, since it is still subtracting 1 element s worth of space from the desired count. (And let s ignore for the moment the open-coded calculation that may end up with an arithmetic over/underflow here; that can be solved separately by using the struct_size() helper or the size_mul(), size_add(), etc family of helpers.) The missed adjustment to the size calculation is relatively easy to find in this example, but sometimes it s much less obvious how structure sizes might be woven into the code. I ve been checking for issues by using the fantastic diffoscope tool. It can produce a LOT of noise if you try to compare builds without keeping in mind the issues solved by reproducible builds, with some additional notes. I prepare my build with the known to disrupt code layout options disabled, but with debug info enabled:
$ KBF="KBUILD_BUILD_TIMESTAMP=1970-01-01 KBUILD_BUILD_USER=user KBUILD_BUILD_HOST=host KBUILD_BUILD_VERSION=1"
$ OUT=gcc
$ make $KBF O=$OUT allmodconfig
$ ./scripts/config --file $OUT/.config \
        -d GCOV_KERNEL -d KCOV -d GCC_PLUGINS -d IKHEADERS -d KASAN -d UBSAN \
        -d DEBUG_INFO_NONE -e DEBUG_INFO_DWARF_TOOLCHAIN_DEFAULT
$ make $KBF O=$OUT olddefconfig
Then I build a stock target, saving the output in before . In this case, I m examining drivers/scsi/megaraid/:
$ make -jN $KBF O=$OUT drivers/scsi/megaraid/
$ mkdir -p $OUT/before
$ cp $OUT/drivers/scsi/megaraid/*.o $OUT/before/
Then I patch and build a modified target, saving the output in after :
$ vi the/source/code.c
$ make -jN $KBF O=$OUT drivers/scsi/megaraid/
$ mkdir -p $OUT/after
$ cp $OUT/drivers/scsi/megaraid/*.o $OUT/after/
And then run diffoscope:
$ diffoscope $OUT/before/ $OUT/after/
If diffoscope output reports nothing, then we re done. Usually, though, when source lines move around other stuff will shift too (e.g. WARN macros rely on line numbers, so the bug table may change contents a bit, etc), and diffoscope output will look noisy. To examine just the executable code, the command that diffoscope used is reported in the output, and we can run it directly, but with possibly shifted line numbers not reported. i.e. running objdump without --line-numbers:
$ ARGS="--disassemble --demangle --reloc --no-show-raw-insn --section=.text"
$ for i in $(cd $OUT/before && echo *.o); do
        echo $i
        diff -u <(objdump $ARGS $OUT/before/$i   sed "0,/^Disassembly/d") \
                <(objdump $ARGS $OUT/after/$i    sed "0,/^Disassembly/d")
done
If I see an unexpected difference, for example:
-    c120:      movq   $0x0,0x800(%rbx)
+    c120:      movq   $0x0,0x7f8(%rbx)
Then I'll search for the pattern with line numbers added to the objdump output:
$ vi <(objdump --line-numbers $ARGS $OUT/after/megaraid_sas_fp.o)
I'd search for "0x0,0x7f8", find the source file and line number above it, open that source file at that position, and look to see where something was being miscalculated:
$ vi drivers/scsi/megaraid/megaraid_sas_fp.c +329
Once tracked down, I'd start over at the "patch and build a modified target" step above, repeating until there were no differences. For example, in the starting example, I'd also need to make this change:
-    size_t bytes = sizeof(*instance) + sizeof(u32) * (count - 1);
+    size_t bytes = sizeof(*instance) + sizeof(u32) * count;
Though, as hinted earlier, better yet would be:
-    size_t bytes = sizeof(*instance) + sizeof(u32) * (count - 1);
+    size_t bytes = struct_size(instance, data, count);
But sometimes adding the helper usage will add binary output differences since they're performing overflow checking that might saturate at SIZE_MAX. To help with patch clarity, those changes can be done separately from fixing the array declaration.

2022, Kees Cook. This work is licensed under a Creative Commons Attribution-ShareAlike 4.0 License.
CC BY-SA 4.0

18 June 2022

Bastian Venthur: blag is now available in Debian

Last year, I wrote my own blog-aware static site generator in Python. I called it blag named after the blag of the webcomic xkcd. Now I finally got around packaging- and uploading blag to Debian. It passed the NEW queue and is now part of the distribution. That means if you re using Debian, you can install it via:
sudo aptitude install blag
Ubuntu will probably follow soon. For every other system, blag is also available on PyPI:
pip install blag
To get started, you can
mkdir blog && cd blog
blag quickstart                        # fill out some info
nvim content/hello-world.md            # write some content
blag build                             # build the website
Blag is aware of articles and pages: the difference is that articles are part of the blog and will be added to the atom feed, the archive and aggregated in the tag pages. Pages are just rendered out to HTML. Articles and pages can be freely mixed in the content directory, what differentiates an article from a page is the existence of the dade metadata element:
title: My first article
description: Short description of the article
date: 2022-06-18 23:00
tags: blogging, markdown
## Hello World!
Lorem ipsum.
[...]
blag also comes with a dev-server that rebuilds the website automatically on every change detected, you can start it using:
blag serve
The default theme looks quite ugly, and you probably want to create your own styling to make it more beautiful. The process is not very difficult if you re familiar with jinja templating. Help on that can be found in the Templating section of the online documentation, the offline version in the blag-doc package, or the man page, respectively. Speaking of the blag-doc package: packaging it was surprisingly tricky, and it also took me a lot of trial and error to realize that dh_sphinxdocs alone does not automatically put the generated html output into the appropriate package, you rather have to list them in the package.docs-file (i.e. blag-doc.docs) so dh_installdocs can install them properly.

11 June 2022

Louis-Philippe V ronneau: Updating a rooted Pixel 3a

A short while after getting a Pixel 3a, I decided to root it, mostly to have more control over the charging procedure. In order to preserve battery life, I like my phone to stop charging at around 75% of full battery capacity and to shut down automatically at around 12%. Some Android ROMs have extra settings to manage this, but LineageOS unfortunately does not. Android already comes with a fairly complex mechanism to handle the charge cycle, but it is mostly controlled by the kernel and cannot be easily configured by end-users. acc is a higher-level "systemless" interface for the Android kernel battery management, but one needs root to do anything interesting with it. Once rooted, you can use the AccA app instead of playing on the command line to fine tune your battery settings. Sadly, having a rooted phone also means I need to re-root it each time there is an OS update (typically each week). Somehow, I keep forgetting the exact procedure to do this! Hopefully, I will be able to use this post as a reference in the future :) Note that these instructions might not apply to your exact phone model, proceed with caution! Extract the boot.img file This procedure mostly comes from the LineageOS documentation on extracting proprietary blobs from the payload.
  1. Download the latest LineageOS image for your phone.
  2. unzip the image to get the payload.bin file inside it.
  3. Clone the LineageOS scripts git repository: $ git clone https://github.com/LineageOS/scripts
  4. extract the boot image (requires python3-protobuf): $ mkdir extracted-payload $ python3 scripts/update-payload-extractor/extract.py payload.bin --output_dir extracted-payload
You should now have a boot.img file. Patch the boot image file using Magisk
  1. Upload the boot.img file you previously extracted to your device.
  2. Open Magisk and patch the boot.img file.
  3. Download the patched file back on your computer.
Flash the patched boot image
  1. Enable ADB debug mode on your phone.
  2. Reboot into fastboot mode. $ adb reboot fastboot
  3. Flash the patched boot image file: $ fastboot flash boot magisk_patched-foo.img
  4. Disable ADB debug mode on your phone.
Troubleshooting In an ideal world, you would do this entire process each time you upgrade to a new LineageOS version. Sadly, this creates friction and makes updating much more troublesome. To simplify things, you can try to flash an old patched boot.img file after upgrading, instead of generating it each time. In my experience, it usually works. When it does not, the device behaves weirdly after a reboot and things that require proprietary blobs (like WiFi) will stop working. If that happens:
  1. Download the latest LineageOS version for your phone.
  2. Reboot into recovery (Power + Volume Down).
  3. Click on "Apply Updates"
  4. Sideload the ROM: $ adb sideload lineageos-foo.zip

26 May 2022

Sergio Talens-Oliag: New Blog Config

As promised, on this post I m going to explain how I ve configured this blog using hugo, asciidoctor and the papermod theme, how I publish it using nginx, how I ve integrated the remark42 comment system and how I ve automated its publication using gitea and json2file-go. It is a long post, but I hope that at least parts of it can be interesting for some, feel free to ignore it if that is not your case

Hugo Configuration

Theme settingsThe site is using the PaperMod theme and as I m using asciidoctor to publish my content I ve adjusted the settings to improve how things are shown with it. The current config.yml file is the one shown below (probably some of the settings are not required nor being used right now, but I m including the current file, so this post will have always the latest version of it):
config.yml
baseURL: https://blogops.mixinet.net/
title: Mixinet BlogOps
paginate: 5
theme: PaperMod
destination: public/
enableInlineShortcodes: true
enableRobotsTXT: true
buildDrafts: false
buildFuture: false
buildExpired: false
enableEmoji: true
pygmentsUseClasses: true
minify:
  disableXML: true
  minifyOutput: true
languages:
  en:
    languageName: "English"
    description: "Mixinet BlogOps - https://blogops.mixinet.net/"
    author: "Sergio Talens-Oliag"
    weight: 1
    title: Mixinet BlogOps
    homeInfoParams:
      Title: "Sergio Talens-Oliag Technical Blog"
      Content: >
        ![Mixinet BlogOps](/images/mixinet-blogops.png)
    taxonomies:
      category: categories
      tag: tags
      series: series
    menu:
      main:
        - name: Archive
          url: archives
          weight: 5
        - name: Categories
          url: categories/
          weight: 10
        - name: Tags
          url: tags/
          weight: 10
        - name: Search
          url: search/
          weight: 15
outputs:
  home:
    - HTML
    - RSS
    - JSON
params:
  env: production
  defaultTheme: light
  disableThemeToggle: false
  ShowShareButtons: true
  ShowReadingTime: true
  disableSpecial1stPost: true
  disableHLJS: true
  displayFullLangName: true
  ShowPostNavLinks: true
  ShowBreadCrumbs: true
  ShowCodeCopyButtons: true
  ShowRssButtonInSectionTermList: true
  ShowFullTextinRSS: true
  ShowToc: true
  TocOpen: false
  comments: true
  remark42SiteID: "blogops"
  remark42Url: "/remark42"
  profileMode:
    enabled: false
    title: Sergio Talens-Oliag Technical Blog
    imageUrl: "/images/mixinet-blogops.png"
    imageTitle: Mixinet BlogOps
    buttons:
      - name: Archives
        url: archives
      - name: Categories
        url: categories
      - name: Tags
        url: tags
  socialIcons:
    - name: CV
      url: "https://www.uv.es/~sto/cv/"
    - name: Debian
      url: "https://people.debian.org/~sto/"
    - name: GitHub
      url: "https://github.com/sto/"
    - name: GitLab
      url: "https://gitlab.com/stalens/"
    - name: Linkedin
      url: "https://www.linkedin.com/in/sergio-talens-oliag/"
    - name: RSS
      url: "index.xml"
  assets:
    disableHLJS: true
    favicon: "/favicon.ico"
    favicon16x16:  "/favicon-16x16.png"
    favicon32x32:  "/favicon-32x32.png"
    apple_touch_icon:  "/apple-touch-icon.png"
    safari_pinned_tab:  "/safari-pinned-tab.svg"
  fuseOpts:
    isCaseSensitive: false
    shouldSort: true
    location: 0
    distance: 1000
    threshold: 0.4
    minMatchCharLength: 0
    keys: ["title", "permalink", "summary", "content"]
markup:
  asciidocExt:
    attributes:  
    backend: html5s
    extensions: ['asciidoctor-html5s','asciidoctor-diagram']
    failureLevel: fatal
    noHeaderOrFooter: true
    preserveTOC: false
    safeMode: unsafe
    sectionNumbers: false
    trace: false
    verbose: false
    workingFolderCurrent: true
privacy:
  vimeo:
    disabled: false
    simple: true
  twitter:
    disabled: false
    enableDNT: true
    simple: true
  instagram:
    disabled: false
    simple: true
  youtube:
    disabled: false
    privacyEnhanced: true
services:
  instagram:
    disableInlineCSS: true
  twitter:
    disableInlineCSS: true
security:
  exec:
    allow:
      - '^asciidoctor$'
      - '^dart-sass-embedded$'
      - '^go$'
      - '^npx$'
      - '^postcss$'
Some notes about the settings:
  • disableHLJS and assets.disableHLJS are set to true; we plan to use rouge on adoc and the inclusion of the hljs assets adds styles that collide with the ones used by rouge.
  • ShowToc is set to true and the TocOpen setting is set to false to make the ToC appear collapsed initially. My plan was to use the asciidoctor ToC, but after trying I believe that the theme one looks nice and I don t need to adjust styles, although it has some issues with the html5s processor (the admonition titles use <h6> and they are shown on the ToC, which is weird), to fix it I ve copied the layouts/partial/toc.html to my site repository and replaced the range of headings to end at 5 instead of 6 (in fact 5 still seems a lot, but as I don t think I ll use that heading level on the posts it doesn t really matter).
  • params.profileMode values are adjusted, but for now I ve left it disabled setting params.profileMode.enabled to false and I ve set the homeInfoParams to show more or less the same content with the latest posts under it (I ve added some styles to my custom.css style sheet to center the text and image of the first post to match the look and feel of the profile).
  • On the asciidocExt section I ve adjusted the backend to use html5s, I ve added the asciidoctor-html5s and asciidoctor-diagram extensions to asciidoctor and adjusted the workingFolderCurrent to true to make asciidoctor-diagram work right (haven t tested it yet).

Theme customisationsTo write in asciidoctor using the html5s processor I ve added some files to the assets/css/extended directory:
  1. As said before, I ve added the file assets/css/extended/custom.css to make the homeInfoParams look like the profile page and I ve also changed a little bit some theme styles to make things look better with the html5s output:
    custom.css
    /* Fix first entry alignment to make it look like the profile */
    .first-entry   text-align: center;  
    .first-entry img   display: inline;  
    /**
     * Remove margin for .post-content code and reduce padding to make it look
     * better with the asciidoctor html5s output.
     **/
    .post-content code   margin: auto 0; padding: 4px;  
  2. I ve also added the file assets/css/extended/adoc.css with some styles taken from the asciidoctor-default.css, see this blog post about the original file; mine is the same after formatting it with css-beautify and editing it to use variables for the colors to support light and dark themes:
    adoc.css
    /* AsciiDoctor*/
    table  
        border-collapse: collapse;
        border-spacing: 0
     
    .admonitionblock>table  
        border-collapse: separate;
        border: 0;
        background: none;
        width: 100%
     
    .admonitionblock>table td.icon  
        text-align: center;
        width: 80px
     
    .admonitionblock>table td.icon img  
        max-width: none
     
    .admonitionblock>table td.icon .title  
        font-weight: bold;
        font-family: "Open Sans", "DejaVu Sans", sans-serif;
        text-transform: uppercase
     
    .admonitionblock>table td.content  
        padding-left: 1.125em;
        padding-right: 1.25em;
        border-left: 1px solid #ddddd8;
        color: var(--primary)
     
    .admonitionblock>table td.content>:last-child>:last-child  
        margin-bottom: 0
     
    .admonitionblock td.icon [class^="fa icon-"]  
        font-size: 2.5em;
        text-shadow: 1px 1px 2px var(--secondary);
        cursor: default
     
    .admonitionblock td.icon .icon-note::before  
        content: "\f05a";
        color: var(--icon-note-color)
     
    .admonitionblock td.icon .icon-tip::before  
        content: "\f0eb";
        color: var(--icon-tip-color)
     
    .admonitionblock td.icon .icon-warning::before  
        content: "\f071";
        color: var(--icon-warning-color)
     
    .admonitionblock td.icon .icon-caution::before  
        content: "\f06d";
        color: var(--icon-caution-color)
     
    .admonitionblock td.icon .icon-important::before  
        content: "\f06a";
        color: var(--icon-important-color)
     
    .conum[data-value]  
        display: inline-block;
        color: #fff !important;
        background-color: rgba(100, 100, 0, .8);
        -webkit-border-radius: 100px;
        border-radius: 100px;
        text-align: center;
        font-size: .75em;
        width: 1.67em;
        height: 1.67em;
        line-height: 1.67em;
        font-family: "Open Sans", "DejaVu Sans", sans-serif;
        font-style: normal;
        font-weight: bold
     
    .conum[data-value] *  
        color: #fff !important
     
    .conum[data-value]+b  
        display: none
     
    .conum[data-value]::after  
        content: attr(data-value)
     
    pre .conum[data-value]  
        position: relative;
        top: -.125em
     
    b.conum *  
        color: inherit !important
     
    .conum:not([data-value]):empty  
        display: none
     
  3. The previous file uses variables from a partial copy of the theme-vars.css file that changes the highlighted code background color and adds the color definitions used by the admonitions:
    theme-vars.css
    :root  
        /* Solarized base2 */
        /* --hljs-bg: rgb(238, 232, 213); */
        /* Solarized base3 */
        /* --hljs-bg: rgb(253, 246, 227); */
        /* Solarized base02 */
        --hljs-bg: rgb(7, 54, 66);
        /* Solarized base03 */
        /* --hljs-bg: rgb(0, 43, 54); */
        /* Default asciidoctor theme colors */
        --icon-note-color: #19407c;
        --icon-tip-color: var(--primary);
        --icon-warning-color: #bf6900;
        --icon-caution-color: #bf3400;
        --icon-important-color: #bf0000
     
    .dark  
        --hljs-bg: rgb(7, 54, 66);
        /* Asciidoctor theme colors with tint for dark background */
        --icon-note-color: #3e7bd7;
        --icon-tip-color: var(--primary);
        --icon-warning-color: #ff8d03;
        --icon-caution-color: #ff7847;
        --icon-important-color: #ff3030
     
  4. The previous styles use font-awesome, so I ve downloaded its resources for version 4.7.0 (the one used by asciidoctor) storing the font-awesome.css into on the assets/css/extended dir (that way it is merged with the rest of .css files) and copying the fonts to the static/assets/fonts/ dir (will be served directly):
    FA_BASE_URL="https://cdnjs.cloudflare.com/ajax/libs/font-awesome/4.7.0"
    curl "$FA_BASE_URL/css/font-awesome.css" \
      > assets/css/extended/font-awesome.css
    for f in FontAwesome.otf fontawesome-webfont.eot \
      fontawesome-webfont.svg fontawesome-webfont.ttf \
      fontawesome-webfont.woff fontawesome-webfont.woff2; do
        curl "$FA_BASE_URL/fonts/$f" > "static/assets/fonts/$f"
    done
  5. As already said the default highlighter is disabled (it provided a css compatible with rouge) so we need a css to do the highlight styling; as rouge provides a way to export them, I ve created the assets/css/extended/rouge.css file with the thankful_eyes theme:
    rougify style thankful_eyes > assets/css/extended/rouge.css
  6. To support the use of the html5s backend with admonitions I ve added a variation of the example found on this blog post to assets/js/adoc-admonitions.js:
    adoc-admonitions.js
    // replace the default admonitions block with a table that uses a format
    // similar to the standard asciidoctor ... as we are using fa-icons here there
    // is no need to add the icons: font entry on the document.
    window.addEventListener('load', function ()  
      const admonitions = document.getElementsByClassName('admonition-block')
      for (let i = admonitions.length - 1; i >= 0; i--)  
        const elm = admonitions[i]
        const type = elm.classList[1]
        const title = elm.getElementsByClassName('block-title')[0];
    	const label = title.getElementsByClassName('title-label')[0]
    		.innerHTML.slice(0, -1);
        elm.removeChild(elm.getElementsByClassName('block-title')[0]);
        const text = elm.innerHTML
        const parent = elm.parentNode
        const tempDiv = document.createElement('div')
        tempDiv.innerHTML =  <div class="admonitionblock $ type ">
        <table>
          <tbody>
            <tr>
              <td class="icon">
                <i class="fa icon-$ type " title="$ label "></i>
              </td>
              <td class="content">
                $ text 
              </td>
            </tr>
          </tbody>
        </table>
      </div> 
        const input = tempDiv.childNodes[0]
        parent.replaceChild(input, elm)
       
     )
    and enabled its minified use on the layouts/partials/extend_footer.html file adding the following lines to it:
     - $admonitions := slice (resources.Get "js/adoc-admonitions.js")
        resources.Concat "assets/js/adoc-admonitions.js"   minify   fingerprint  
    <script defer crossorigin="anonymous" src="  $admonitions.RelPermalink  "
      integrity="  $admonitions.Data.Integrity  "></script>

Remark42 configurationTo integrate Remark42 with the PaperMod theme I ve created the file layouts/partials/comments.html with the following content based on the remark42 documentation, including extra code to sync the dark/light setting with the one set on the site:
comments.html
<div id="remark42"></div>
<script>
  var remark_config =  
    host:   .Site.Params.remark42Url  ,
    site_id:   .Site.Params.remark42SiteID  ,
    url:   .Permalink  ,
    locale:   .Site.Language.Lang  
   ;
  (function(c)  
    /* Adjust the theme using the local-storage pref-theme if set */
    if (localStorage.getItem("pref-theme") === "dark")  
      remark_config.theme = "dark";
      else if (localStorage.getItem("pref-theme") === "light")  
      remark_config.theme = "light";
     
    /* Add remark42 widget */
    for(var i = 0; i < c.length; i++) 
      var d = document, s = d.createElement('script');
      s.src = remark_config.host + '/web/' + c[i] +'.js';
      s.defer = true;
      (d.head   d.body).appendChild(s);
     
   )(remark_config.components   ['embed']);
</script>
In development I use it with anonymous comments enabled, but to avoid SPAM the production site uses social logins (for now I ve only enabled Github & Google, if someone requests additional services I ll check them, but those were the easy ones for me initially). To support theme switching with remark42 I ve also added the following inside the layouts/partials/extend_footer.html file:
 - if (not site.Params.disableThemeToggle)  
<script>
/* Function to change theme when the toggle button is pressed */
document.getElementById("theme-toggle").addEventListener("click", () =>  
  if (typeof window.REMARK42 != "undefined")  
    if (document.body.className.includes('dark'))  
      window.REMARK42.changeTheme('light');
      else  
      window.REMARK42.changeTheme('dark');
     
   
 );
</script>
 - end  
With this code if the theme-toggle button is pressed we change the remark42 theme before the PaperMod one (that s needed here only, on page loads the remark42 theme is synced with the main one using the code from the layouts/partials/comments.html shown earlier).

Development setupTo preview the site on my laptop I m using docker-compose with the following configuration:
docker-compose.yaml
version: "2"
services:
  hugo:
    build:
      context: ./docker/hugo-adoc
      dockerfile: ./Dockerfile
    image: sto/hugo-adoc
    container_name: hugo-adoc-blogops
    restart: always
    volumes:
      - .:/documents
    command: server --bind 0.0.0.0 -D -F
    user: $ APP_UID :$ APP_GID 
  nginx:
    image: nginx:latest
    container_name: nginx-blogops
    restart: always
    volumes:
      - ./nginx/default.conf:/etc/nginx/conf.d/default.conf
    ports:
      -  1313:1313
  remark42:
    build:
      context: ./docker/remark42
      dockerfile: ./Dockerfile
    image: sto/remark42
    container_name: remark42-blogops
    restart: always
    env_file:
      - ./.env
      - ./remark42/env.dev
    volumes:
      - ./remark42/var.dev:/srv/var
To run it properly we have to create the .env file with the current user ID and GID on the variables APP_UID and APP_GID (if we don t do it the files can end up being owned by a user that is not the same as the one running the services):
$ echo "APP_UID=$(id -u)\nAPP_GID=$(id -g)" > .env
The Dockerfile used to generate the sto/hugo-adoc is:
Dockerfile
FROM asciidoctor/docker-asciidoctor:latest
RUN gem install --no-document asciidoctor-html5s &&\
 apk update && apk add --no-cache curl libc6-compat &&\
 repo_path="gohugoio/hugo" &&\
 api_url="https://api.github.com/repos/$repo_path/releases/latest" &&\
 download_url="$(\
  curl -sL "$api_url"  \
  sed -n "s/^.*download_url\": \"\\(.*.extended.*Linux-64bit.tar.gz\)\"/\1/p"\
 )" &&\
 curl -sL "$download_url" -o /tmp/hugo.tgz &&\
 tar xf /tmp/hugo.tgz hugo &&\
 install hugo /usr/bin/ &&\
 rm -f hugo /tmp/hugo.tgz &&\
 /usr/bin/hugo version &&\
 apk del curl && rm -rf /var/cache/apk/*
# Expose port for live server
EXPOSE 1313
ENTRYPOINT ["/usr/bin/hugo"]
CMD [""]
If you review it you will see that I m using the docker-asciidoctor image as the base; the idea is that this image has all I need to work with asciidoctor and to use hugo I only need to download the binary from their latest release at github (as we are using an image based on alpine we also need to install the libc6-compat package, but once that is done things are working fine for me so far). The image does not launch the server by default because I don t want it to; in fact I use the same docker-compose.yml file to publish the site in production simply calling the container without the arguments passed on the docker-compose.yml file (see later). When running the containers with docker-compose up (or docker compose up if you have the docker-compose-plugin package installed) we also launch a nginx container and the remark42 service so we can test everything together. The Dockerfile for the remark42 image is the original one with an updated version of the init.sh script:
Dockerfile
FROM umputun/remark42:latest
COPY init.sh /init.sh
The updated init.sh is similar to the original, but allows us to use an APP_GID variable and updates the /etc/group file of the container so the files get the right user and group (with the original script the group is always 1001):
init.sh
#!/sbin/dinit /bin/sh
uid="$(id -u)"
if [ "$ uid " -eq "0" ]; then
  echo "init container"
  # set container's time zone
  cp "/usr/share/zoneinfo/$ TIME_ZONE " /etc/localtime
  echo "$ TIME_ZONE " >/etc/timezone
  echo "set timezone $ TIME_ZONE  ($(date))"
  # set UID & GID for the app
  if [ "$ APP_UID " ]   [ "$ APP_GID " ]; then
    [ "$ APP_UID " ]   APP_UID="1001"
    [ "$ APP_GID " ]   APP_GID="$ APP_UID "
    echo "set custom APP_UID=$ APP_UID  & APP_GID=$ APP_GID "
    sed -i "s/^app:x:1001:1001:/app:x:$ APP_UID :$ APP_GID :/" /etc/passwd
    sed -i "s/^app:x:1001:/app:x:$ APP_GID :/" /etc/group
  else
    echo "custom APP_UID and/or APP_GID not defined, using 1001:1001"
  fi
  chown -R app:app /srv /home/app
fi
echo "prepare environment"
# replace  % REMARK_URL %  by content of REMARK_URL variable
find /srv -regex '.*\.\(html\ js\ mjs\)$' -print \
  -exec sed -i "s % REMARK_URL % $ REMARK_URL  g"   \;
if [ -n "$ SITE_ID " ]; then
  #replace "site_id: 'remark'" by SITE_ID
  sed -i "s 'remark' '$ SITE_ID ' g" /srv/web/*.html
fi
echo "execute \"$*\""
if [ "$ uid " -eq "0" ]; then
  exec su-exec app "$@"
else
  exec "$@"
fi
The environment file used with remark42 for development is quite minimal:
env.dev
TIME_ZONE=Europe/Madrid
REMARK_URL=http://localhost:1313/remark42
SITE=blogops
SECRET=123456
ADMIN_SHARED_ID=sto
AUTH_ANON=true
EMOJI=true
And the nginx/default.conf file used to publish the service locally is simple too:
default.conf
server   
 listen 1313;
 server_name localhost;
 location /  
    proxy_pass http://hugo:1313;
    proxy_set_header Host $http_host;
    proxy_set_header X-Real-IP $remote_addr;
    proxy_set_header X-Forwarded-For $proxy_add_x_forwarded_for;
    proxy_set_header X-Forwarded-Proto $scheme;
    proxy_set_header Upgrade $http_upgrade;
    proxy_set_header Connection "upgrade";
  
 location /remark42/  
    rewrite /remark42/(.*) /$1 break;
    proxy_pass http://remark42:8080/;
    proxy_set_header Host $http_host;
    proxy_set_header X-Real-IP $remote_addr;
    proxy_set_header X-Forwarded-For $proxy_add_x_forwarded_for;
    proxy_set_header X-Forwarded-Proto $scheme;


Production setupThe VM where I m publishing the blog runs Debian GNU/Linux and uses binaries from local packages and applications packaged inside containers. To run the containers I m using docker-ce (I could have used podman instead, but I already had it installed on the machine, so I stayed with it). The binaries used on this project are included on the following packages from the main Debian repository:
  • git to clone & pull the repository,
  • jq to parse json files from shell scripts,
  • json2file-go to save the webhook messages to files,
  • inotify-tools to detect when new files are stored by json2file-go and launch scripts to process them,
  • nginx to publish the site using HTTPS and work as proxy for json2file-go and remark42 (I run it using a container),
  • task-spool to queue the scripts that update the deployment.
And I m using docker and docker compose from the debian packages on the docker repository:
  • docker-ce to run the containers,
  • docker-compose-plugin to run docker compose (it is a plugin, so no - in the name).

Repository checkoutTo manage the git repository I ve created a deploy key, added it to gitea and cloned the project on the /srv/blogops PATH (that route is owned by a regular user that has permissions to run docker, as I said before).

Compiling the site with hugoTo compile the site we are using the docker-compose.yml file seen before, to be able to run it first we build the container images and once we have them we launch hugo using docker compose run:
$ cd /srv/blogops
$ git pull
$ docker compose build
$ if [ -d "./public" ]; then rm -rf ./public; fi
$ docker compose run hugo --
The compilation leaves the static HTML on /srv/blogops/public (we remove the directory first because hugo does not clean the destination folder as jekyll does). The deploy script re-generates the site as described and moves the public directory to its final place for publishing.

Running remark42 with dockerOn the /srv/blogops/remark42 folder I have the following docker-compose.yml:
docker-compose.yml
version: "2"
services:
  remark42:
    build:
      context: ../docker/remark42
      dockerfile: ./Dockerfile
    image: sto/remark42
    env_file:
      - ../.env
      - ./env.prod
    container_name: remark42
    restart: always
    volumes:
      - ./var.prod:/srv/var
    ports:
      - 127.0.0.1:8042:8080
The ../.env file is loaded to get the APP_UID and APP_GID variables that are used by my version of the init.sh script to adjust file permissions and the env.prod file contains the rest of the settings for remark42, including the social network tokens (see the remark42 documentation for the available parameters, I don t include my configuration here because some of them are secrets).

Nginx configurationThe nginx configuration for the blogops.mixinet.net site is as simple as:
server  
  listen 443 ssl http2;
  server_name blogops.mixinet.net;
  ssl_certificate /etc/letsencrypt/live/blogops.mixinet.net/fullchain.pem;
  ssl_certificate_key /etc/letsencrypt/live/blogops.mixinet.net/privkey.pem;
  include /etc/letsencrypt/options-ssl-nginx.conf;
  ssl_dhparam /etc/letsencrypt/ssl-dhparams.pem;
  access_log /var/log/nginx/blogops.mixinet.net-443.access.log;
  error_log  /var/log/nginx/blogops.mixinet.net-443.error.log;
  root /srv/blogops/nginx/public_html;
  location /  
    try_files $uri $uri/ =404;
   
  include /srv/blogops/nginx/remark42.conf;
 
server  
  listen 80 ;
  listen [::]:80 ;
  server_name blogops.mixinet.net;
  access_log /var/log/nginx/blogops.mixinet.net-80.access.log;
  error_log  /var/log/nginx/blogops.mixinet.net-80.error.log;
  if ($host = blogops.mixinet.net)  
    return 301 https://$host$request_uri;
   
  return 404;
 
On this configuration the certificates are managed by certbot and the server root directory is on /srv/blogops/nginx/public_html and not on /srv/blogops/public; the reason for that is that I want to be able to compile without affecting the running site, the deployment script generates the site on /srv/blogops/public and if all works well we rename folders to do the switch, making the change feel almost atomic.

json2file-go configurationAs I have a working WireGuard VPN between the machine running gitea at my home and the VM where the blog is served, I m going to configure the json2file-go to listen for connections on a high port using a self signed certificate and listening on IP addresses only reachable through the VPN. To do it we create a systemd socket to run json2file-go and adjust its configuration to listen on a private IP (we use the FreeBind option on its definition to be able to launch the service even when the IP is not available, that is, when the VPN is down). The following script can be used to set up the json2file-go configuration:
setup-json2file.sh
#!/bin/sh
set -e
# ---------
# VARIABLES
# ---------
BASE_DIR="/srv/blogops/webhook"
J2F_DIR="$BASE_DIR/json2file"
TLS_DIR="$BASE_DIR/tls"
J2F_SERVICE_NAME="json2file-go"
J2F_SERVICE_DIR="/etc/systemd/system/json2file-go.service.d"
J2F_SERVICE_OVERRIDE="$J2F_SERVICE_DIR/override.conf"
J2F_SOCKET_DIR="/etc/systemd/system/json2file-go.socket.d"
J2F_SOCKET_OVERRIDE="$J2F_SOCKET_DIR/override.conf"
J2F_BASEDIR_FILE="/etc/json2file-go/basedir"
J2F_DIRLIST_FILE="/etc/json2file-go/dirlist"
J2F_CRT_FILE="/etc/json2file-go/certfile"
J2F_KEY_FILE="/etc/json2file-go/keyfile"
J2F_CRT_PATH="$TLS_DIR/crt.pem"
J2F_KEY_PATH="$TLS_DIR/key.pem"
# ----
# MAIN
# ----
# Install packages used with json2file for the blogops site
sudo apt update
sudo apt install -y json2file-go uuid
if [ -z "$(type mkcert)" ]; then
  sudo apt install -y mkcert
fi
sudo apt clean
# Configuration file values
J2F_USER="$(id -u)"
J2F_GROUP="$(id -g)"
J2F_DIRLIST="blogops:$(uuid)"
J2F_LISTEN_STREAM="172.31.31.1:4443"
# Configure json2file
[ -d "$J2F_DIR" ]   mkdir "$J2F_DIR"
sudo sh -c "echo '$J2F_DIR' >'$J2F_BASEDIR_FILE'"
[ -d "$TLS_DIR" ]   mkdir "$TLS_DIR"
if [ ! -f "$J2F_CRT_PATH" ]   [ ! -f "$J2F_KEY_PATH" ]; then
  mkcert -cert-file "$J2F_CRT_PATH" -key-file "$J2F_KEY_PATH" "$(hostname -f)"
fi
sudo sh -c "echo '$J2F_CRT_PATH' >'$J2F_CRT_FILE'"
sudo sh -c "echo '$J2F_KEY_PATH' >'$J2F_KEY_FILE'"
sudo sh -c "cat >'$J2F_DIRLIST_FILE'" <<EOF
$(echo "$J2F_DIRLIST"   tr ';' '\n')
EOF
# Service override
[ -d "$J2F_SERVICE_DIR" ]   sudo mkdir "$J2F_SERVICE_DIR"
sudo sh -c "cat >'$J2F_SERVICE_OVERRIDE'" <<EOF
[Service]
User=$J2F_USER
Group=$J2F_GROUP
EOF
# Socket override
[ -d "$J2F_SOCKET_DIR" ]   sudo mkdir "$J2F_SOCKET_DIR"
sudo sh -c "cat >'$J2F_SOCKET_OVERRIDE'" <<EOF
[Socket]
# Set FreeBind to listen on missing addresses (the VPN can be down sometimes)
FreeBind=true
# Set ListenStream to nothing to clear its value and add the new value later
ListenStream=
ListenStream=$J2F_LISTEN_STREAM
EOF
# Restart and enable service
sudo systemctl daemon-reload
sudo systemctl stop "$J2F_SERVICE_NAME"
sudo systemctl start "$J2F_SERVICE_NAME"
sudo systemctl enable "$J2F_SERVICE_NAME"
# ----
# vim: ts=2:sw=2:et:ai:sts=2
Warning: The script uses mkcert to create the temporary certificates, to install the package on bullseye the backports repository must be available.

Gitea configurationTo make gitea use our json2file-go server we go to the project and enter into the hooks/gitea/new page, once there we create a new webhook of type gitea and set the target URL to https://172.31.31.1:4443/blogops and on the secret field we put the token generated with uuid by the setup script:
sed -n -e 's/blogops://p' /etc/json2file-go/dirlist
The rest of the settings can be left as they are:
  • Trigger on: Push events
  • Branch filter: *
Warning: We are using an internal IP and a self signed certificate, that means that we have to review that the webhook section of the app.ini of our gitea server allows us to call the IP and skips the TLS verification (you can see the available options on the gitea documentation). The [webhook] section of my server looks like this:
[webhook]
ALLOWED_HOST_LIST=private
SKIP_TLS_VERIFY=true
Once we have the webhook configured we can try it and if it works our json2file server will store the file on the /srv/blogops/webhook/json2file/blogops/ folder.

The json2file spooler scriptWith the previous configuration our system is ready to receive webhook calls from gitea and store the messages on files, but we have to do something to process those files once they are saved in our machine. An option could be to use a cronjob to look for new files, but we can do better on Linux using inotify we will use the inotifywait command from inotify-tools to watch the json2file output directory and execute a script each time a new file is moved inside it or closed after writing (IN_CLOSE_WRITE and IN_MOVED_TO events). To avoid concurrency problems we are going to use task-spooler to launch the scripts that process the webhooks using a queue of length 1, so they are executed one by one in a FIFO queue. The spooler script is this:
blogops-spooler.sh
#!/bin/sh
set -e
# ---------
# VARIABLES
# ---------
BASE_DIR="/srv/blogops/webhook"
BIN_DIR="$BASE_DIR/bin"
TSP_DIR="$BASE_DIR/tsp"
WEBHOOK_COMMAND="$BIN_DIR/blogops-webhook.sh"
# ---------
# FUNCTIONS
# ---------
queue_job()  
  echo "Queuing job to process file '$1'"
  TMPDIR="$TSP_DIR" TS_SLOTS="1" TS_MAXFINISHED="10" \
    tsp -n "$WEBHOOK_COMMAND" "$1"
 
# ----
# MAIN
# ----
INPUT_DIR="$1"
if [ ! -d "$INPUT_DIR" ]; then
  echo "Input directory '$INPUT_DIR' does not exist, aborting!"
  exit 1
fi
[ -d "$TSP_DIR" ]   mkdir "$TSP_DIR"
echo "Processing existing files under '$INPUT_DIR'"
find "$INPUT_DIR" -type f   sort   while read -r _filename; do
  queue_job "$_filename"
done
# Use inotifywatch to process new files
echo "Watching for new files under '$INPUT_DIR'"
inotifywait -q -m -e close_write,moved_to --format "%w%f" -r "$INPUT_DIR"  
  while read -r _filename; do
    queue_job "$_filename"
  done
# ----
# vim: ts=2:sw=2:et:ai:sts=2
To run it as a daemon we install it as a systemd service using the following script:
setup-spooler.sh
#!/bin/sh
set -e
# ---------
# VARIABLES
# ---------
BASE_DIR="/srv/blogops/webhook"
BIN_DIR="$BASE_DIR/bin"
J2F_DIR="$BASE_DIR/json2file"
SPOOLER_COMMAND="$BIN_DIR/blogops-spooler.sh '$J2F_DIR'"
SPOOLER_SERVICE_NAME="blogops-j2f-spooler"
SPOOLER_SERVICE_FILE="/etc/systemd/system/$SPOOLER_SERVICE_NAME.service"
# Configuration file values
J2F_USER="$(id -u)"
J2F_GROUP="$(id -g)"
# ----
# MAIN
# ----
# Install packages used with the webhook processor
sudo apt update
sudo apt install -y inotify-tools jq task-spooler
sudo apt clean
# Configure process service
sudo sh -c "cat > $SPOOLER_SERVICE_FILE" <<EOF
[Install]
WantedBy=multi-user.target
[Unit]
Description=json2file processor for $J2F_USER
After=docker.service
[Service]
Type=simple
User=$J2F_USER
Group=$J2F_GROUP
ExecStart=$SPOOLER_COMMAND
EOF
# Restart and enable service
sudo systemctl daemon-reload
sudo systemctl stop "$SPOOLER_SERVICE_NAME"   true
sudo systemctl start "$SPOOLER_SERVICE_NAME"
sudo systemctl enable "$SPOOLER_SERVICE_NAME"
# ----
# vim: ts=2:sw=2:et:ai:sts=2

The gitea webhook processorFinally, the script that processes the JSON files does the following:
  1. First, it checks if the repository and branch are right,
  2. Then, it fetches and checks out the commit referenced on the JSON file,
  3. Once the files are updated, compiles the site using hugo with docker compose,
  4. If the compilation succeeds the script renames directories to swap the old version of the site by the new one.
If there is a failure the script aborts but before doing it or if the swap succeeded the system sends an email to the configured address and/or the user that pushed updates to the repository with a log of what happened. The current script is this one:
blogops-webhook.sh
#!/bin/sh
set -e
# ---------
# VARIABLES
# ---------
# Values
REPO_REF="refs/heads/main"
REPO_CLONE_URL="https://gitea.mixinet.net/mixinet/blogops.git"
MAIL_PREFIX="[BLOGOPS-WEBHOOK] "
# Address that gets all messages, leave it empty if not wanted
MAIL_TO_ADDR="blogops@mixinet.net"
# If the following variable is set to 'true' the pusher gets mail on failures
MAIL_ERRFILE="false"
# If the following variable is set to 'true' the pusher gets mail on success
MAIL_LOGFILE="false"
# gitea's conf/app.ini value of NO_REPLY_ADDRESS, it is used for email domains
# when the KeepEmailPrivate option is enabled for a user
NO_REPLY_ADDRESS="noreply.example.org"
# Directories
BASE_DIR="/srv/blogops"
PUBLIC_DIR="$BASE_DIR/public"
NGINX_BASE_DIR="$BASE_DIR/nginx"
PUBLIC_HTML_DIR="$NGINX_BASE_DIR/public_html"
WEBHOOK_BASE_DIR="$BASE_DIR/webhook"
WEBHOOK_SPOOL_DIR="$WEBHOOK_BASE_DIR/spool"
WEBHOOK_ACCEPTED="$WEBHOOK_SPOOL_DIR/accepted"
WEBHOOK_DEPLOYED="$WEBHOOK_SPOOL_DIR/deployed"
WEBHOOK_REJECTED="$WEBHOOK_SPOOL_DIR/rejected"
WEBHOOK_TROUBLED="$WEBHOOK_SPOOL_DIR/troubled"
WEBHOOK_LOG_DIR="$WEBHOOK_SPOOL_DIR/log"
# Files
TODAY="$(date +%Y%m%d)"
OUTPUT_BASENAME="$(date +%Y%m%d-%H%M%S.%N)"
WEBHOOK_LOGFILE_PATH="$WEBHOOK_LOG_DIR/$OUTPUT_BASENAME.log"
WEBHOOK_ACCEPTED_JSON="$WEBHOOK_ACCEPTED/$OUTPUT_BASENAME.json"
WEBHOOK_ACCEPTED_LOGF="$WEBHOOK_ACCEPTED/$OUTPUT_BASENAME.log"
WEBHOOK_REJECTED_TODAY="$WEBHOOK_REJECTED/$TODAY"
WEBHOOK_REJECTED_JSON="$WEBHOOK_REJECTED_TODAY/$OUTPUT_BASENAME.json"
WEBHOOK_REJECTED_LOGF="$WEBHOOK_REJECTED_TODAY/$OUTPUT_BASENAME.log"
WEBHOOK_DEPLOYED_TODAY="$WEBHOOK_DEPLOYED/$TODAY"
WEBHOOK_DEPLOYED_JSON="$WEBHOOK_DEPLOYED_TODAY/$OUTPUT_BASENAME.json"
WEBHOOK_DEPLOYED_LOGF="$WEBHOOK_DEPLOYED_TODAY/$OUTPUT_BASENAME.log"
WEBHOOK_TROUBLED_TODAY="$WEBHOOK_TROUBLED/$TODAY"
WEBHOOK_TROUBLED_JSON="$WEBHOOK_TROUBLED_TODAY/$OUTPUT_BASENAME.json"
WEBHOOK_TROUBLED_LOGF="$WEBHOOK_TROUBLED_TODAY/$OUTPUT_BASENAME.log"
# Query to get variables from a gitea webhook json
ENV_VARS_QUERY="$(
  printf "%s" \
    '(.             @sh "gt_ref=\(.ref);"),' \
    '(.             @sh "gt_after=\(.after);"),' \
    '(.repository   @sh "gt_repo_clone_url=\(.clone_url);"),' \
    '(.repository   @sh "gt_repo_name=\(.name);"),' \
    '(.pusher       @sh "gt_pusher_full_name=\(.full_name);"),' \
    '(.pusher       @sh "gt_pusher_email=\(.email);")'
)"
# ---------
# Functions
# ---------
webhook_log()  
  echo "$(date -R) $*" >>"$WEBHOOK_LOGFILE_PATH"
 
webhook_check_directories()  
  for _d in "$WEBHOOK_SPOOL_DIR" "$WEBHOOK_ACCEPTED" "$WEBHOOK_DEPLOYED" \
    "$WEBHOOK_REJECTED" "$WEBHOOK_TROUBLED" "$WEBHOOK_LOG_DIR"; do
    [ -d "$_d" ]   mkdir "$_d"
  done
 
webhook_clean_directories()  
  # Try to remove empty dirs
  for _d in "$WEBHOOK_ACCEPTED" "$WEBHOOK_DEPLOYED" "$WEBHOOK_REJECTED" \
    "$WEBHOOK_TROUBLED" "$WEBHOOK_LOG_DIR" "$WEBHOOK_SPOOL_DIR"; do
    if [ -d "$_d" ]; then
      rmdir "$_d" 2>/dev/null   true
    fi
  done
 
webhook_accept()  
  webhook_log "Accepted: $*"
  mv "$WEBHOOK_JSON_INPUT_FILE" "$WEBHOOK_ACCEPTED_JSON"
  mv "$WEBHOOK_LOGFILE_PATH" "$WEBHOOK_ACCEPTED_LOGF"
  WEBHOOK_LOGFILE_PATH="$WEBHOOK_ACCEPTED_LOGF"
 
webhook_reject()  
  [ -d "$WEBHOOK_REJECTED_TODAY" ]   mkdir "$WEBHOOK_REJECTED_TODAY"
  webhook_log "Rejected: $*"
  if [ -f "$WEBHOOK_JSON_INPUT_FILE" ]; then
    mv "$WEBHOOK_JSON_INPUT_FILE" "$WEBHOOK_REJECTED_JSON"
  fi
  mv "$WEBHOOK_LOGFILE_PATH" "$WEBHOOK_REJECTED_LOGF"
  exit 0
 
webhook_deployed()  
  [ -d "$WEBHOOK_DEPLOYED_TODAY" ]   mkdir "$WEBHOOK_DEPLOYED_TODAY"
  webhook_log "Deployed: $*"
  mv "$WEBHOOK_ACCEPTED_JSON" "$WEBHOOK_DEPLOYED_JSON"
  mv "$WEBHOOK_ACCEPTED_LOGF" "$WEBHOOK_DEPLOYED_LOGF"
  WEBHOOK_LOGFILE_PATH="$WEBHOOK_DEPLOYED_LOGF"
 
webhook_troubled()  
  [ -d "$WEBHOOK_TROUBLED_TODAY" ]   mkdir "$WEBHOOK_TROUBLED_TODAY"
  webhook_log "Troubled: $*"
  mv "$WEBHOOK_ACCEPTED_JSON" "$WEBHOOK_TROUBLED_JSON"
  mv "$WEBHOOK_ACCEPTED_LOGF" "$WEBHOOK_TROUBLED_LOGF"
  WEBHOOK_LOGFILE_PATH="$WEBHOOK_TROUBLED_LOGF"
 
print_mailto()  
  _addr="$1"
  _user_email=""
  # Add the pusher email address unless it is from the domain NO_REPLY_ADDRESS,
  # which should match the value of that variable on the gitea 'app.ini' (it
  # is the domain used for emails when the user hides it).
  # shellcheck disable=SC2154
  if [ -n "$ gt_pusher_email##*@"$ NO_REPLY_ADDRESS " " ] &&
    [ -z "$ gt_pusher_email##*@* " ]; then
    _user_email="\"$gt_pusher_full_name <$gt_pusher_email>\""
  fi
  if [ "$_addr" ] && [ "$_user_email" ]; then
    echo "$_addr,$_user_email"
  elif [ "$_user_email" ]; then
    echo "$_user_email"
  elif [ "$_addr" ]; then
    echo "$_addr"
  fi
 
mail_success()  
  to_addr="$MAIL_TO_ADDR"
  if [ "$MAIL_LOGFILE" = "true" ]; then
    to_addr="$(print_mailto "$to_addr")"
  fi
  if [ "$to_addr" ]; then
    # shellcheck disable=SC2154
    subject="OK - $gt_repo_name updated to commit '$gt_after'"
    mail -s "$ MAIL_PREFIX $ subject " "$to_addr" \
      <"$WEBHOOK_LOGFILE_PATH"
  fi
 
mail_failure()  
  to_addr="$MAIL_TO_ADDR"
  if [ "$MAIL_ERRFILE" = true ]; then
    to_addr="$(print_mailto "$to_addr")"
  fi
  if [ "$to_addr" ]; then
    # shellcheck disable=SC2154
    subject="KO - $gt_repo_name update FAILED for commit '$gt_after'"
    mail -s "$ MAIL_PREFIX $ subject " "$to_addr" \
      <"$WEBHOOK_LOGFILE_PATH"
  fi
 
# ----
# MAIN
# ----
# Check directories
webhook_check_directories
# Go to the base directory
cd "$BASE_DIR"
# Check if the file exists
WEBHOOK_JSON_INPUT_FILE="$1"
if [ ! -f "$WEBHOOK_JSON_INPUT_FILE" ]; then
  webhook_reject "Input arg '$1' is not a file, aborting"
fi
# Parse the file
webhook_log "Processing file '$WEBHOOK_JSON_INPUT_FILE'"
eval "$(jq -r "$ENV_VARS_QUERY" "$WEBHOOK_JSON_INPUT_FILE")"
# Check that the repository clone url is right
# shellcheck disable=SC2154
if [ "$gt_repo_clone_url" != "$REPO_CLONE_URL" ]; then
  webhook_reject "Wrong repository: '$gt_clone_url'"
fi
# Check that the branch is the right one
# shellcheck disable=SC2154
if [ "$gt_ref" != "$REPO_REF" ]; then
  webhook_reject "Wrong repository ref: '$gt_ref'"
fi
# Accept the file
# shellcheck disable=SC2154
webhook_accept "Processing '$gt_repo_name'"
# Update the checkout
ret="0"
git fetch >>"$WEBHOOK_LOGFILE_PATH" 2>&1   ret="$?"
if [ "$ret" -ne "0" ]; then
  webhook_troubled "Repository fetch failed"
  mail_failure
fi
# shellcheck disable=SC2154
git checkout "$gt_after" >>"$WEBHOOK_LOGFILE_PATH" 2>&1   ret="$?"
if [ "$ret" -ne "0" ]; then
  webhook_troubled "Repository checkout failed"
  mail_failure
fi
# Remove the build dir if present
if [ -d "$PUBLIC_DIR" ]; then
  rm -rf "$PUBLIC_DIR"
fi
# Build site
docker compose run hugo -- >>"$WEBHOOK_LOGFILE_PATH" 2>&1   ret="$?"
# go back to the main branch
git switch main && git pull
# Fail if public dir was missing
if [ "$ret" -ne "0" ]   [ ! -d "$PUBLIC_DIR" ]; then
  webhook_troubled "Site build failed"
  mail_failure
fi
# Remove old public_html copies
webhook_log 'Removing old site versions, if present'
find $NGINX_BASE_DIR -mindepth 1 -maxdepth 1 -name 'public_html-*' -type d \
  -exec rm -rf   \; >>"$WEBHOOK_LOGFILE_PATH" 2>&1   ret="$?"
if [ "$ret" -ne "0" ]; then
  webhook_troubled "Removal of old site versions failed"
  mail_failure
fi
# Switch site directory
TS="$(date +%Y%m%d-%H%M%S)"
if [ -d "$PUBLIC_HTML_DIR" ]; then
  webhook_log "Moving '$PUBLIC_HTML_DIR' to '$PUBLIC_HTML_DIR-$TS'"
  mv "$PUBLIC_HTML_DIR" "$PUBLIC_HTML_DIR-$TS" >>"$WEBHOOK_LOGFILE_PATH" 2>&1  
    ret="$?"
fi
if [ "$ret" -eq "0" ]; then
  webhook_log "Moving '$PUBLIC_DIR' to '$PUBLIC_HTML_DIR'"
  mv "$PUBLIC_DIR" "$PUBLIC_HTML_DIR" >>"$WEBHOOK_LOGFILE_PATH" 2>&1  
    ret="$?"
fi
if [ "$ret" -ne "0" ]; then
  webhook_troubled "Site switch failed"
  mail_failure
else
  webhook_deployed "Site deployed successfully"
  mail_success
fi
# ----
# vim: ts=2:sw=2:et:ai:sts=2

27 April 2022

Antoine Beaupr : building Debian packages under qemu with sbuild

I've been using sbuild for a while to build my Debian packages, mainly because it's what is used by the Debian autobuilders, but also because it's pretty powerful and efficient. Configuring it just right, however, can be a challenge. In my quick Debian development guide, I had a few pointers on how to configure sbuild with the normal schroot setup, but today I finished a qemu based configuration.

Why I want to use qemu mainly because it provides better isolation than a chroot. I sponsor packages sometimes and while I typically audit the source code before building, it still feels like the extra protection shouldn't hurt. I also like the idea of unifying my existing virtual machine setup with my build setup. My current VM is kind of all over the place: libvirt, vagrant, GNOME Boxes, etc?). I've been slowly converging over libvirt however, and most solutions I use right now rely on qemu under the hood, certainly not chroots... I could also have decided to go with containers like LXC, LXD, Docker (with conbuilder, whalebuilder, docker-buildpackage), systemd-nspawn (with debspawn), unshare (with schroot --chroot-mode=unshare), or whatever: I didn't feel those offer the level of isolation that is provided by qemu. The main downside of this approach is that it is (obviously) slower than native builds. But on modern hardware, that cost should be minimal.

How Basically, you need this:
sudo mkdir -p /srv/sbuild/qemu/
sudo apt install sbuild-qemu
sudo sbuild-qemu-create -o /srv/sbuild/qemu/unstable.img unstable https://deb.debian.org/debian
Then to make this used by default, add this to ~/.sbuildrc:
# run autopkgtest inside the schroot
$run_autopkgtest = 1;
# tell sbuild to use autopkgtest as a chroot
$chroot_mode = 'autopkgtest';
# tell autopkgtest to use qemu
$autopkgtest_virt_server = 'qemu';
# tell autopkgtest-virt-qemu the path to the image
# use --debug there to show what autopkgtest is doing
$autopkgtest_virt_server_options = [ '--', '/srv/sbuild/qemu/%r-%a.img' ];
# tell plain autopkgtest to use qemu, and the right image
$autopkgtest_opts = [ '--', 'qemu', '/srv/sbuild/qemu/%r-%a.img' ];
# no need to cleanup the chroot after build, we run in a completely clean VM
$purge_build_deps = 'never';
# no need for sudo
$autopkgtest_root_args = '';
Note that the above will use the default autopkgtest (1GB, one core) and qemu (128MB, one core) configuration, which might be a little low on resources. You probably want to be explicit about this, with something like this:
# extra parameters to pass to qemu
# --enable-kvm is not necessary, detected on the fly by autopkgtest
my @_qemu_options = ['--ram-size=4096', '--cpus=2'];
# tell autopkgtest-virt-qemu the path to the image
# use --debug there to show what autopkgtest is doing
$autopkgtest_virt_server_options = [ @_qemu_options, '--', '/srv/sbuild/qemu/%r-%a.img' ];
$autopkgtest_opts = [ '--', 'qemu', @qemu_options, '/srv/sbuild/qemu/%r-%a.img'];
This configuration will:
  1. create a virtual machine image in /srv/sbuild/qemu for unstable
  2. tell sbuild to use that image to create a temporary VM to build the packages
  3. tell sbuild to run autopkgtest (which should really be default)
  4. tell autopkgtest to use qemu for builds and for tests
Note that the VM created by sbuild-qemu-create have an unlocked root account with an empty password.

Other useful tasks
  • enter the VM to make test, changes will be discarded (thanks Nick Brown for the sbuild-qemu-boot tip!):
     sbuild-qemu-boot /srv/sbuild/qemu/unstable-amd64.img
    
    That program is shipped only with bookworm and later, an equivalent command is:
     qemu-system-x86_64 -snapshot -enable-kvm -object rng-random,filename=/dev/urandom,id=rng0 -device virtio-rng-pci,rng=rng0,id=rng-device0 -m 2048 -nographic /srv/sbuild/qemu/unstable-amd64.img
    
    The key argument here is -snapshot.
  • enter the VM to make permanent changes, which will not be discarded:
     sudo sbuild-qemu-boot --readwrite /srv/sbuild/qemu/unstable-amd64.img
    
    Equivalent command:
     sudo qemu-system-x86_64 -enable-kvm -object rng-random,filename=/dev/urandom,id=rng0 -device virtio-rng-pci,rng=rng0,id=rng-device0 -m 2048 -nographic /srv/sbuild/qemu/unstable-amd64.img
    
  • update the VM (thanks lavamind):
     sudo sbuild-qemu-update /srv/sbuild/qemu/unstable-amd64.img
    
  • build in a specific VM regardless of the suite specified in the changelog (e.g. UNRELEASED, bookworm-backports, bookworm-security, etc):
     sbuild --autopkgtest-virt-server-opts="-- qemu /var/lib/sbuild/qemu/bookworm-amd64.img"
    
    Note that you'd also need to pass --autopkgtest-opts if you want autopkgtest to run in the correct VM as well:
     sbuild --autopkgtest-opts="-- qemu /var/lib/sbuild/qemu/unstable.img" --autopkgtest-virt-server-opts="-- qemu /var/lib/sbuild/qemu/bookworm-amd64.img"
    
    You might also need parameters like --ram-size if you customized it above.
And yes, this is all quite complicated and could be streamlined a little, but that's what you get when you have years of legacy and just want to get stuff done. It seems to me autopkgtest-virt-qemu should have a magic flag starts a shell for you, but it doesn't look like that's a thing. When that program starts, it just says ok and sits there. Maybe because the authors consider the above to be simple enough (see also bug #911977 for a discussion of this problem).

Live access to a running test When autopkgtest starts a VM, it uses this funky qemu commandline:
qemu-system-x86_64 -m 4096 -smp 2 -nographic -net nic,model=virtio -net user,hostfwd=tcp:127.0.0.1:10022-:22 -object rng-random,filename=/dev/urandom,id=rng0 -device virtio-rng-pci,rng=rng0,id=rng-device0 -monitor unix:/tmp/autopkgtest-qemu.w1mlh54b/monitor,server,nowait -serial unix:/tmp/autopkgtest-qemu.w1mlh54b/ttyS0,server,nowait -serial unix:/tmp/autopkgtest-qemu.w1mlh54b/ttyS1,server,nowait -virtfs local,id=autopkgtest,path=/tmp/autopkgtest-qemu.w1mlh54b/shared,security_model=none,mount_tag=autopkgtest -drive index=0,file=/tmp/autopkgtest-qemu.w1mlh54b/overlay.img,cache=unsafe,if=virtio,discard=unmap,format=qcow2 -enable-kvm -cpu kvm64,+vmx,+lahf_lm
... which is a typical qemu commandline, I'm sorry to say. That gives us a VM with those settings (paths are relative to a temporary directory, /tmp/autopkgtest-qemu.w1mlh54b/ in the above example):
  • the shared/ directory is, well, shared with the VM
  • port 10022 is forward to the VM's port 22, presumably for SSH, but not SSH server is started by default
  • the ttyS1 and ttyS2 UNIX sockets are mapped to the first two serial ports (use nc -U to talk with those)
  • the monitor UNIX socket is a qemu control socket (see the QEMU monitor documentation, also nc -U)
In other words, it's possible to access the VM with:
nc -U /tmp/autopkgtest-qemu.w1mlh54b/ttyS2
The nc socket interface is ... not great, but it works well enough. And you can probably fire up an SSHd to get a better shell if you feel like it.

Nitty-gritty details no one cares about

Fixing hang in sbuild cleanup I'm having a hard time making heads or tails of this, but please bear with me. In sbuild + schroot, there's this notion that we don't really need to cleanup after ourselves inside the schroot, as the schroot will just be delted anyways. This behavior seems to be handled by the internal "Session Purged" parameter. At least in lib/Sbuild/Build.pm, we can see this:
my $is_cloned_session = (defined ($session->get('Session Purged')) &&
             $session->get('Session Purged') == 1) ? 1 : 0;
[...]
if ($is_cloned_session)  
$self->log("Not cleaning session: cloned chroot in use\n");
  else  
if ($purge_build_deps)  
    # Removing dependencies
    $resolver->uninstall_deps();
  else  
    $self->log("Not removing build depends: as requested\n");
 
 
The schroot builder defines that parameter as:
    $self->set('Session Purged', $info-> 'Session Purged' );
... which is ... a little confusing to me. $info is:
my $info = $self->get('Chroots')->get_info($schroot_session);
... so I presume that depends on whether the schroot was correctly cleaned up? I stopped digging there... ChrootUnshare.pm is way more explicit:
$self->set('Session Purged', 1);
I wonder if we should do something like this with the autopkgtest backend. I guess people might technically use it with something else than qemu, but qemu is the typical use case of the autopkgtest backend, in my experience. Or at least certainly with things that cleanup after themselves. Right? For some reason, before I added this line to my configuration:
$purge_build_deps = 'never';
... the "Cleanup" step would just completely hang. It was quite bizarre.

Disgression on the diversity of VM-like things There are a lot of different virtualization solutions one can use (e.g. Xen, KVM, Docker or Virtualbox). I have also found libguestfs to be useful to operate on virtual images in various ways. Libvirt and Vagrant are also useful wrappers on top of the above systems. There are particularly a lot of different tools which use Docker, Virtual machines or some sort of isolation stronger than chroot to build packages. Here are some of the alternatives I am aware of: Take, for example, Whalebuilder, which uses Docker to build packages instead of pbuilder or sbuild. Docker provides more isolation than a simple chroot: in whalebuilder, packages are built without network access and inside a virtualized environment. Keep in mind there are limitations to Docker's security and that pbuilder and sbuild do build under a different user which will limit the security issues with building untrusted packages. On the upside, some of things are being fixed: whalebuilder is now an official Debian package (whalebuilder) and has added the feature of passing custom arguments to dpkg-buildpackage. None of those solutions (except the autopkgtest/qemu backend) are implemented as a sbuild plugin, which would greatly reduce their complexity. I was previously using Qemu directly to run virtual machines, and had to create VMs by hand with various tools. This didn't work so well so I switched to using Vagrant as a de-facto standard to build development environment machines, but I'm returning to Qemu because it uses a similar backend as KVM and can be used to host longer-running virtual machines through libvirt. The great thing now is that autopkgtest has good support for qemu and sbuild has bridged the gap and can use it as a build backend. I originally had found those bugs in that setup, but all of them are now fixed:
  • #911977: sbuild: how do we correctly guess the VM name in autopkgtest?
  • #911979: sbuild: fails on chown in autopkgtest-qemu backend
  • #911963: autopkgtest qemu build fails with proxy_cmd: parameter not set
  • #911981: autopkgtest: qemu server warns about missing CPU features
So we have unification! It's possible to run your virtual machines and Debian builds using a single VM image backend storage, which is no small feat, in my humble opinion. See the sbuild-qemu blog post for the annoucement Now I just need to figure out how to merge Vagrant, GNOME Boxes, and libvirt together, which should be a matter of placing images in the right place... right? See also hosting.

pbuilder vs sbuild I was previously using pbuilder and switched in 2017 to sbuild. AskUbuntu.com has a good comparative between pbuilder and sbuild that shows they are pretty similar. The big advantage of sbuild is that it is the tool in use on the buildds and it's written in Perl instead of shell. My concerns about switching were POLA (I'm used to pbuilder), the fact that pbuilder runs as a separate user (works with sbuild as well now, if the _apt user is present), and setting up COW semantics in sbuild (can't just plug cowbuilder there, need to configure overlayfs or aufs, which was non-trivial in Debian jessie). Ubuntu folks, again, have more documentation there. Debian also has extensive documentation, especially about how to configure overlays. I was ultimately convinced by stapelberg's post on the topic which shows how much simpler sbuild really is...

Who Thanks lavamind for the introduction to the sbuild-qemu package.

8 April 2022

Jacob Adams: The Unexpected Importance of the Trailing Slash

For many using Unix-derived systems today, we take for granted that /some/path and /some/path/ are the same. Most shells will even add a trailing slash for you when you press the Tab key after the name of a directory or a symbolic link to one. However, many programs treat these two paths as subtly different in certain cases, which I outline below, as all three have tripped me up in various ways1.

POSIX and Coreutils Perhaps the trickiest use of the trailing slash in a distinguishing way is in POSIX2 which states:
When the final component of a pathname is a symbolic link, the standard requires that a trailing <slash> causes the link to be followed. This is the behavior of historical implementations3. For example, for /a/b and /a/b/, if /a/b is a symbolic link to a directory, then /a/b refers to the symbolic link, and /a/b/ refers to the directory to which the symbolic link points.
This leads to some unexpected behavior. For example, if you have the following structure of a directory dir containing a file dirfile with a symbolic link link pointing to dir. (which will be used in all shell examples throughout this article):
$ ls -lR
.:
total 4
drwxr-xr-x 2 jacob jacob 4096 Apr  3 00:00 dir
lrwxrwxrwx 1 jacob jacob    3 Apr  3 00:00 link -> dir
./dir:
total 0
-rw-r--r-- 1 jacob jacob 0 Apr  3 00:12 dirfile
On Unixes such as MacOS, FreeBSD or Illumos4, you can move a directory through a symbolic link by using a trailing slash:
$ mv link/ otherdir
$ ls
link	otherdir
On Linux5, mv will not rename the indirectly referenced directory and not the symbolic link, when given a symbolic link with a trailing slash as the source to be renamed. despite the coreutils documentation s claims to the contrary6, instead failing with Not a directory:
$ mv link/ other
mv: cannot move 'link/' to 'other': Not a directory
$ mkdir otherdir
$ mv link/ otherdir
mv: cannot move 'link/' to 'otherdir/link': Not a directory
$ mv link/ otherdir/
mv: cannot move 'link/' to 'otherdir/link': Not a directory
$ mv link otherdirlink
$ ls -l otherdirlink
lrwxrwxrwx 1 jacob jacob 3 Apr  3 00:13 otherdirlink -> dir
This is probably for the best, as it is very confusing behavior. There is still one advantage the trailing slash has when using mv, even on Linux, in that is it does not allow you to move a file to a non-existent directory, or move a file that you expect to be a directory that isn t.
$ mv dir/dirfile nonedir/
mv: cannot move 'dir/dirfile' to 'nonedir/': Not a directory
$ touch otherfile
$ mv otherfile/ dir
mv: cannot stat 'otherfile/': Not a directory
$ mv otherfile dir
$ ls dir
dirfile  otherfile
However, Linux still exhibits some confusing behavior of its own, like when you attempt to remove link recursively with a trailing slash:
rm -rvf link/
Neither link nor dir are removed, but the contents of dir are removed:
removed 'link/dirfile'
Whereas if you remove the trailing slash, you just remove the symbolic link:
$ rm -rvf link
removed 'link'
While on MacOS, FreeBSD or Illumos4, rm will also remove the source directory:
$ rm -rvf link
link/dirfile
link/
$ ls
link
The find and ls commands, in contrast, behave the same on all three operating systems. The find command only searches the contents of the directory a symbolic link points to if the trailing slash is added:
$ find link -name dirfile
$ find link/ -name dirfile
link/dirfile
The ls command acts similarly, showing information on just a symbolic link by itself unless a trailing slash is added, at which point it shows the contents of the directory that it links to:
$ ls -l link
lrwxrwxrwx 1 jacob jacob 3 Apr  3 00:13 link -> dir
$ ls -l link/
total 0
-rw-r--r-- 1 jacob jacob 0 Apr  3 00:13 dirfile

rsync The command rsync handles a trailing slash in an unusual way that trips up many new users. The rsync man page notes:
You can think of a trailing / on a source as meaning copy the contents of this directory as opposed to copy the directory by name , but in both cases the attributes of the containing directory are transferred to the containing directory on the destination.
That is to say, if we had two folders a and b each of which contained some files:
$ ls -R .
.:
a  b
./a:
a1  a2
./b:
b1  b2
Running rsync -av a b moves the entire directory a to directory b:
$ rsync -av a b
sending incremental file list
a/
a/a1
a/a2
sent 181 bytes  received 58 bytes  478.00 bytes/sec
total size is 0  speedup is 0.00
$ ls -R b
b:
a  b1  b2
b/a:
a1  a2
While running rsync -av a/ b moves the contents of directory a to b:
$ rsync -av a/ b
sending incremental file list
./
a1
a2
sent 170 bytes  received 57 bytes  454.00 bytes/sec
total size is 0  speedup is 0.00
$ ls b
a1  a2	b1  b2

Dockerfile COPY The Dockerfile COPY command also cares about the presence of the trailing slash, using it to determine whether the destination should be considered a file or directory. The Docker documentation explains the rules of the command thusly:
COPY [--chown=<user>:<group>] <src>... <dest>
If <src> is a directory, the entire contents of the directory are copied, including filesystem metadata. Note: The directory itself is not copied, just its contents. If <src> is any other kind of file, it is copied individually along with its metadata. In this case, if <dest> ends with a trailing slash /, it will be considered a directory and the contents of <src> will be written at <dest>/base(<src>). If multiple <src> resources are specified, either directly or due to the use of a wildcard, then <dest> must be a directory, and it must end with a slash /. If <dest> does not end with a trailing slash, it will be considered a regular file and the contents of <src> will be written at <dest>. If <dest> doesn t exist, it is created along with all missing directories in its path.
This means if you had a COPY command that moved file to a nonexistent containerfile without the slash, it would create containerfile as a file with the contents of file.
COPY file /containerfile
container$ stat -c %F containerfile
regular empty file
Whereas if you add a trailing slash, then file will be added as a file under the new directory containerdir:
COPY file /containerdir/
container$ stat -c %F containerdir
directory
Interestingly, at no point can you copy a directory completely, only its contents. Thus if you wanted to make a directory in the new container, you need to specify its name in both the source and the destination:
COPY dir /dirincontainer
container$ stat -c %F /dirincontainer
directory
Dockerfiles do also make good use of the trailing slash to ensure they re doing what you mean by requiring a trailing slash on the destination of multiple files:
COPY file otherfile /othercontainerdir
results in the following error:
When using COPY with more than one source file, the destination must be a directory and end with a /
  1. I m sure there are probably more than just these three cases, but these are the three I m familiar with. If you know of more, please tell me about them!.
  2. Some additional relevant sections are the Path Resolution Appendix and the section on Symbolic Links.
  3. The sentence This is the behavior of historical implementations implies that this probably originated in some ancient Unix derivative, possibly BSD or even the original Unix. I don t really have a source on that though, so please reach out if you happen to have any more knowledge on what this refers to.
  4. I tested on MacOS 11.6.5, FreeBSD 12.0 and OmniOS 5.11 2
  5. unless the source is a directory trailing slashes give -ENOTDIR
  6. In fairness to the coreutils maintainers, it seems to be true on all other Unix platforms, but it probably deserves a mention in the documentation when Linux is the most common platform on which coreutils is used. I should submit a patch.

1 April 2022

Russell Coker: Converting to UEFI

When I got my HP ML110 Gen9 working as a workstation I initially was under the impression that boot wasn t supported on NVMe and booted it from USB. I found USB booting with legacy boot to be unreliable so decided to try EFI booting and noticed that the NVMe devices were boot candidates with UEFI. Making one of them bootable was more complex than expected because no-one seems to have documented such things. So here s my documentation, it s not great but this method has worked once for me. Before starting major partitioning work it s best to run parted -l and save the output to a file, that can allow you to recreate partitions if you corrupt them. One thing I m doing on systems I manage is putting @reboot /usr/sbin/parted -l > /root/parted.log in the root crontab, then when the system is backed up the backup server gets any recent changes to partitioning (I don t backup /var/log on all my systems). Firstly run parted on the device to create the EFI and /boot partitions, note that if you want to copy and paste from this you must do so one line at a time, a block paste seemed to confuse parted.
mklabel gpt
mkpart EFI fat32 1 99
mkpart boot ext3 99 300
toggle 1 boot
toggle 1 esp
p
# Model: CT1000P1SSD8 (nvme)
# Disk /dev/nvme1n1: 1000GB
# Sector size (logical/physical): 512B/512B
# Partition Table: gpt
# Disk Flags: 
#
# Number  Start   End     Size    File system  Name  Flags
#  1      1049kB  98.6MB  97.5MB  fat32        EFI   boot, esp
#  2      98.6MB  300MB   201MB   ext3         boot
q
Here are the commands needed to create the filesystems and install the necessary files. This is almost to the stage of being scriptable. Some minor changes need to be made to convert from NVMe device names to SATA/SAS but nothing serious.
mkfs.vfat /dev/nvme1n1p1
mkfs.ext3 -N 1000 /dev/nvme1n1p2
file -s /dev/nvme1n1p2   sed -e s/^.*UUID/UUID/ -e "s/ .*$/ \/boot ext3 noatime 0 1/" >> /etc/fstab
file -s /dev/nvme1n1p1   tr "[a-f]" "[A-F]"  sed -e s/^.*numBEr.0x/UUID=/ -e "s/, .*$/ \/boot\/efi vfat umask=0077 0 1/" >> /etc/fstab
# edit /etc/fstab to put a hyphen between the 2 groups of 4 chars for the VFAT filesystem UUID
mount /boot
mkdir -p /boot/efi /boot/grub
mount /boot/efi
mkdir -p /boot/efi/EFI/debian
apt install efibootmgr shim-unsigned grub-efi-amd64
cp /usr/lib/shim/* /usr/lib/grub/x86_64-efi/monolithic/grubx64.efi /boot/efi/EFI/debian
file -s /dev/nvme1n1p2   sed -e "s/^.*UUID=/search.fs_uuid /" -e "s/ .needs.*$/ root hd0,gpt2/" > /boot/efi/EFI/debian/grub.cfg
echo "set prefix=(\$root)'/boot/grub'" >> /boot/efi/EFI/debian/grub.cfg
echo "configfile \$prefix/grub.cfg" >> /boot/efi/EFI/debian/grub.cfg
grub-install
update-grub
If someone would like to make a script that can handle the different partition names of regular SCSI/SATA disks, NVMe, CCISS, etc then that would be great. It would be good to have a script in Debian that creates the partitions and sets up the EFI files. If you want to have a second bootable device then the following commands will copy a GPT partition table and give it new UUIDs, make very certain that $DISKB is the one you want to be wiped and refer to my previous mention of parted -l . Also note that parted has a rescue command which works very well.
sgdisk /dev/$DISKA -R /dev/$DISKB 
sgdisk -G /dev/$DISKB
To backup a GPT partition table run a command like this. Note that if sgdisk is told to backup a MBR partitioned disk it will say Found invalid GPT and valid MBR; converting MBR to GPT forma which is probably a viable way of converting MBR format to GPT.
sgdisk -b sda.bak /dev/sda

29 March 2022

Jeremy Bicha: How to install a bunch of debs

Recently, I needed to check if a regression in Ubuntu 22.04 Beta was triggered by the mesa upgrade. Ok, sounds simple, let me just install the older mesa version. Let s take a look. Oh, wow, there are about 24 binary packages (excluding the packages for debug symbols) included in mesa! Because it s no longer published in Ubuntu 22.04, we can t use our normal apt way to install those packages. And downloading those one by one and then installing them sounds like too much work. Step Zero: Prerequisites If you are an Ubuntu (or Debian!) developer, you might already have ubuntu-dev-tools installed. If not, it has some really useful tools!
$ sudo apt install ubuntu-dev-tools
Step One: Create a Temporary Working Directory Let s create a temporary directory to hold our deb packages. We don t want to get them mixed up with other things.
$ mkdir mesa-downgrade; cd mesa-downgrade
Step Two: Download All the Things One of the useful tools is pull-lp-debs. The first argument is the source package name. In this case, I next need to specify what version I want; otherwise it will give me the latest version which isn t helpful. I could specify a series codename like jammy or impish but that won t give me what I want this time.
$ pull-lp-debs mesa 21.3.5-1ubuntu2
By the way, there are several other variations on pull-lp-debs: I use the LP and Debian source versions frequently when I just want to check something in a package but don t need the full git repo. Step Three: Install Only What We Need This command allows us to install just what we need.
$ sudo apt install --only-upgrade --mark-auto ./*.deb
--only-upgrade tells apt to only install packages that are already installed. I don t actually need all 24 packages installed; I just want to change the versions for the stuff I already have. --mark-auto tells apt to keep these packages marked in dpkg as automatically installed. This allows any of these packages to be suggested for removal once there isn t anything else depending on them. That s useful if you don t want to have old libraries installed on your system in case you do manual installation like this frequently. Finally, the apt install syntax has a quirk: It needs a path to a file because it wants an easy way to distinguish from a package name. So adding ./ before filenames works. I guess this is a bug. apt should be taught that libegl-mesa0_21.3.5-1ubuntu2_amd64.deb is a file name not a package name. Step Four: Cleanup Let s assume that you installed old versions. To get back to the current package versions, you can just upgrade like normal.
$ sudo apt dist-upgrade
If you do want to stay on this unsupported version a bit longer, you can specify which packages to hold:
$ sudo apt-mark hold
And you can use apt-mark list and apt-mark unhold to see what packages you have held and release the holds. Remember you won t get security updates or other bug fixes for held packages! And when you re done with the debs we download, you can remove all the files:
$ cd .. ; rm -ri mesa-downgrade
Bonus: Downgrading back to supported What if you did the opposite and installed newer stuff than is available in your current release? Perhaps you installed from jammy-proposed and you want to get back to jammy ? Here s the syntax for libegl-mesa0 Note the /jammy suffix on the package name.
$ sudo apt install libegl-mesa0/jammy
But how do you find these packages? Use apt list Here s one suggested way to find them:
$ apt list --installed --all-versions  grep local] --after-context 1
Finally, I should mention that apt is designed to upgrade packages not downgrade them. You can break things by downgrading. For instance, a database could upgrade its format to a new version but I wouldn t expect it to be able to reverse that just because you attempt to install an older version.

3 March 2022

Enrico Zini: Migrating from procmail to sieve

Anarcat's "procmail considered harmful" post convinced me to get my act together and finally migrate my venerable procmail based setup to sieve. My setup was nontrivial, so I migrated with an intermediate step in which sieve scripts would by default pipe everything to procmail, which allowed me to slowly move rules from procmailrc to sieve until nothing remained in procmailrc. Here's what I did. Literature review https://brokkr.net/2019/10/31/lets-do-dovecot-slowly-and-properly-part-3-lmtp/ has a guide quite aligned with current Debian, and could be a starting point to get an idea of the work to do. https://wiki.dovecot.org/HowTo/PostfixDovecotLMTP is way more terse, but more aligned with my intentions. Reading the former helped me in understanding the latter. https://datatracker.ietf.org/doc/html/rfc5228 has the full Sieve syntax. https://doc.dovecot.org/configuration_manual/sieve/pigeonhole_sieve_interpreter/ has the list of Sieve features supported by Dovecot. https://doc.dovecot.org/settings/pigeonhole/ has the reference on Dovecot's sieve implementation. https://raw.githubusercontent.com/dovecot/pigeonhole/master/doc/rfc/spec-bosch-sieve-extprograms.txt is the hard to find full reference for the functions introduced by the extprograms plugin. Debugging tools: Backup of all mails processed One thing I did with procmail was to generate a monthly mailbox with all incoming email, with something like this:
BACKUP="/srv/backupts/test- date +%Y-%m-d .mbox"
:0c
$BACKUP
I did not find an obvious way in sieve to create montly mailboxes, so I redesigned that system using Postfix's always_bcc feature, piping everything to an archive user. I'll then recreate the monthly archiving using a chewmail script that I can simply run via cron. Configure dovecot
apt install dovecot-sieve dovecot-lmtpd
I added this to the local dovecot configuration:
service lmtp  
  unix_listener /var/spool/postfix/private/dovecot-lmtp  
    user = postfix
    group = postfix
    mode = 0666
   
 
protocol lmtp  
  mail_plugins = $mail_plugins sieve
 
plugin  
  sieve = file:~/.sieve;active=~/.dovecot.sieve
 
This makes Dovecot ready to receive mail from Postfix via a lmtp unix socket created in Postfix's private chroot. It also activates the sieve plugin, and uses ~/.sieve as a sieve script. The script can be a file or a directory; if it is a directory, ~/.dovecot.sieve will be a symlink pointing to the .sieve file to run. This is a feature I'm not yet using, but if one day I want to try enabling UIs to edit sieve scripts, that part is ready. Delegate to procmail To make sieve scripts that delegate to procmail, I enabled the sieve_extprograms plugin:
 plugin  
   sieve = file:~/.sieve;active=~/.dovecot.sieve
+  sieve_plugins = sieve_extprograms
+  sieve_extensions +vnd.dovecot.pipe
+  sieve_pipe_bin_dir = /usr/local/lib/dovecot/sieve-pipe
+  sieve_trace_dir = ~/.sieve-trace
+  sieve_trace_level = matching
+  sieve_trace_debug = yes
  
and then created a script for it:
mkdir -p /usr/local/lib/dovecot/sieve-pipe/
(echo "#!/bin/sh'; echo "exec /usr/bin/procmail") > /usr/local/lib/dovecot/sieve-pipe/procmail
chmod 0755 /usr/local/lib/dovecot/sieve-pipe/procmail
And I can have a sieve script that delegates processing to procmail:
require "vnd.dovecot.pipe";
pipe "procmail";
Activate the postfix side These changes switched local delivery over to Dovecot:
--- a/roles/mailserver/templates/dovecot.conf
+++ b/roles/mailserver/templates/dovecot.conf
@@ -25,6 +25,8 @@
 
+auth_username_format = %Ln
+
 
diff --git a/roles/mailserver/templates/main.cf b/roles/mailserver/templates/main.cf
index d2c515a..d35537c 100644
--- a/roles/mailserver/templates/main.cf
+++ b/roles/mailserver/templates/main.cf
@@ -64,8 +64,7 @@ virtual_alias_domains =
 
-mailbox_command = procmail -a "$EXTENSION"
-mailbox_size_limit = 0
+mailbox_transport = lmtp:unix:private/dovecot-lmtp
 
Without auth_username_format = %Ln dovecot won't be able to understand usernames sent by postfix in my specific setup. Moving rules over to sieve This is mostly straightforward, with the luxury of being able to do it a bit at a time. The last tricky bit was how to call spamc from sieve, as in some situations I reduce system load by running the spamfilter only on a prefiltered selection of incoming emails. For this I enabled the filter directive in sieve:
 plugin  
   sieve = file:~/.sieve;active=~/.dovecot.sieve
   sieve_plugins = sieve_extprograms
-  sieve_extensions +vnd.dovecot.pipe
+  sieve_extensions +vnd.dovecot.pipe +vnd.dovecot.filter
   sieve_pipe_bin_dir = /usr/local/lib/dovecot/sieve-pipe
+  sieve_filter_bin_dir = /usr/local/lib/dovecot/sieve-filter
   sieve_trace_dir = ~/.sieve-trace
   sieve_trace_level = matching
   sieve_trace_debug = yes
  
Then I created a filter script:
mkdir -p /usr/local/lib/dovecot/sieve-filter/"
(echo "#!/bin/sh'; echo "exec /usr/bin/spamc") > /usr/local/lib/dovecot/sieve-filter/spamc
chmod 0755 /usr/local/lib/dovecot/sieve-filter/spamc
And now what was previously:
:0 fw
  /usr/bin/spamc
:0
* ^X-Spam-Status: Yes
.spam/
Can become:
require "vnd.dovecot.filter";
require "fileinto";
filter "spamc";
if header :contains "x-spam-level" "**************"  
    discard;
  elsif header :matches "X-Spam-Status" "Yes,*"  
    fileinto "spam";
 
Updates Ansgar mentioned that it's possible to replicate the monthly mailbox using the variables and date extensions, with a hacky trick from the extensions' RFC:
require "date"
require "variables"
if currentdate :matches "month" "*"   set "month" "$ 1 ";  
if currentdate :matches "year" "*"   set "year" "$ 1 ";  
fileinto :create "$ month -$ year ";

21 October 2021

Lisandro Dami n Nicanor P rez Meyer: CMake toolchain files with Debian's cross compilers

Almost a year ago I added a script made by Helmut Grohne that is able to create a CMake toolchain file pre-filled with Debian-specifics ross compilers. The tool is installed by the cmake package and located at /usr/share/cmake/debtoolchainfilegen. It's usage is simple:
debtoolchainfilegen (arch) > cmake_toolchain_<arch>.cmake
Where $arch can be any of the Debian supported architectures, like arm64 (aka aarch64):
$ /usr/share/cmake/debtoolchainfilegen arm64 > /tmp/cmake_toolchain_aarch64
dpkg-architecture: warning: specified GNU system type aarch64-linux-gnu does not match CC system type x86_64-linux-gnu, try setting a correct CC environment variable
$ cat /tmp/cmake_toolchain_aarch64
# Use it while calling CMake:
#   mkdir build; cd build
#   cmake -DCMAKE_TOOLCHAIN_FILE="/path/to/cmake_toolchain_<arch>.cmake" ../
#
set(CMAKE_SYSTEM_NAME "Linux")
set(CMAKE_SYSTEM_PROCESSOR "aarch64")
set(CMAKE_C_COMPILER "aarch64-linux-gnu-gcc")
set(CMAKE_CXX_COMPILER "aarch64-linux-gnu-g++")
set(PKG_CONFIG_EXECUTABLE "aarch64-linux-gnu-pkg-config")
set(PKGCONFIG_EXECUTABLE "aarch64-linux-gnu-pkg-config")
set(QMAKE_EXECUTABLE "aarch64-linux-gnu-qmake")
Note: I kept the warnings, which can be ignored and won't end up on the final file. As you might have noticed the file itself has instructions on how to use it. Of course we will need the requires cross toolchain for the selected arch. For example using arm64:
$ apt install crossbuild-essential-arm64
That's it, we can now start cross building our cmake-based software.

9 August 2021

Dirk Eddelbuettel: nanotime 0.3.3 on CRAN: Some Updates

Leonardo and I are pleased to share that a new nanotime version 0.3.3 was released today, and arrived on CRAN. This release brings a new (plotting) demo, an updated documentation site, additional nanoduration and nanoperiod functionality, and enhanced testing. nanotime relies on the RcppCCTZ package for (efficient) high(er) resolution time parsing and formatting up to nanosecond resolution, and the bit64 package for the actual integer64 arithmetic. Initially implemented using the S3 system, it has benefitted greatly from work by co-author Leonardo who not only rejigged nanotime internals in S4 but also added new S4 types for periods, intervals and durations. The NEWS snippet adds full details.

Changes in version 0.3.3 (2021-08-09)
  • New demo ggplot2Example.R (Leonardo and Dirk).
  • New documentation website using mkdocs-material (Dirk).
  • Updated unit test to account for r-devel POSIXct changes, and re-enable full testing under r-devel (Dirk).
  • Additional nanoduration and character ops plus tests (Colin Umansky in #88 addressing #87).
  • New plus and minus functions for periods (Leonardo in #91).

Thanks to CRANberries there is also a diff to the previous version. More details and examples are at the nanotime page; code, issue tickets etc at the GitHub repository. If you like this or other open-source work I do, you can now sponsor me at GitHub.

This post by Dirk Eddelbuettel originated on his Thinking inside the box blog. Please report excessive re-aggregation in third-party for-profit settings.

24 July 2021

Dirk Eddelbuettel: littler 0.3.13: Moar Goodies

max-heap image The fourteenth release of littler as a CRAN package just landed, following in the now fifteen year history (!!) as a package started by Jeff in 2006, and joined by me a few weeks later. littler is the first command-line interface for R as it predates Rscript. It allows for piping as well for shebang scripting via #!, uses command-line arguments more consistently and still starts faster. It also always loaded the methods package which Rscript only started to do in recent years. littler lives on Linux and Unix, has its difficulties on macOS due to yet-another-braindeadedness there (who ever thought case-insensitive filesystems as a default were a good idea?) and simply does not exist on Windows (yet the build system could be extended see RInside for an existence proof, and volunteers are welcome!). See the FAQ vignette on how to add it to your PATH. A few examples are highlighted at the Github repo, as well as in the examples vignette. This release brings two new example scripts and command wrappers (compiledDeps.r, silenceTwitterAccount.r), along with extensions, corrections, or polish for a number a of other examples as detailed in the NEWS file entry below.

Changes in littler version 0.3.13 (2021-07-24)
  • Changes in examples
    • New script compiledDeps.r to show which dependencies are compiled
    • New script silenceTwitterAccount.r wrapping rtweet
    • The -c or --code option for installRSPM.r was corrected
    • The kitten.r script now passes options bunny and puppy on to the pkgKitten::kitten() call; new options to call the Arma and Eigen variants were added
    • The getRStudioDesktop.r and getRStudioServer.r scripts were updated for a change in rvest
    • Two typos in the tt.r help message were correct (Aaron Wolen in #86)
    • The message in cranIncoming.r was corrected.
  • Changes in package
    • Added Continuous Integration runner via run.sh from r-ci.
    • Two vignettes got two extra vignette attributes.
    • The mkdocs-material documentation input was moved.
    • The basic unit tests were slightly refactored and updated.

My CRANberries provides a comparison to the previous release. Full details for the littler release are provided as usual at the ChangeLog page, and now also on the new package docs website. The code is available via the GitHub repo, from tarballs and now of course also from its CRAN page and via install.packages("littler"). Binary packages are available directly in Debian as well as soon via Ubuntu binaries at CRAN thanks to the tireless Michael Rutter. Comments and suggestions are welcome at the GitHub repo. If you like this or other open-source work I do, you can now sponsor me at GitHub.

This post by Dirk Eddelbuettel originated on his Thinking inside the box blog. Please report excessive re-aggregation in third-party for-profit settings.

30 June 2021

Enrico Zini: Systemd containers with unittest

This is part of a series of posts on ideas for an ansible-like provisioning system, implemented in Transilience. Unit testing some parts of Transilience, like the apt and systemd actions, or remote Mitogen connections, can really use a containerized system for testing. To have that, I reused my work on nspawn-runner. to build a simple and very fast system of ephemeral containers, with minimal dependencies, based on systemd-nspawn and btrfs snapshots: Setup To be able to use systemd-nspawn --ephemeral, the chroots needs to be btrfs subvolumes. If you are not running on a btrfs filesystem, you can create one to run the tests, even on a file:
fallocate -l 1.5G testfile
/usr/sbin/mkfs.btrfs testfile
sudo mount -o loop testfile test_chroots/
I created a script to setup the test environment, here is an extract:
mkdir -p test_chroots
cat << EOF > "test_chroots/CACHEDIR.TAG"
Signature: 8a477f597d28d172789f06886806bc55
# chroots used for testing transilience, can be regenerated with make-test-chroot
EOF
btrfs subvolume create test_chroots/buster
eatmydata debootstrap --variant=minbase --include=python3,dbus,systemd buster test_chroots/buster
CACHEDIR.TAG is a nice trick to tell backup software not to bother backing up the contents of this directory, since it can be easily regenerated. eatmydata is optional, and it speeds up debootstrap quite a bit. Running unittest with sudo Here's a simple helper to drop root as soon as possible, and regain it only when needed. Note that it needs $SUDO_UID and $SUDO_GID, that are set by sudo, to know which user to drop into:
class ProcessPrivs:
    """
    Drop root privileges and regain them only when needed
    """
    def __init__(self):
        self.orig_uid, self.orig_euid, self.orig_suid = os.getresuid()
        self.orig_gid, self.orig_egid, self.orig_sgid = os.getresgid()
        if "SUDO_UID" not in os.environ:
            raise RuntimeError("Tests need to be run under sudo")
        self.user_uid = int(os.environ["SUDO_UID"])
        self.user_gid = int(os.environ["SUDO_GID"])
        self.dropped = False
    def drop(self):
        """
        Drop root privileges
        """
        if self.dropped:
            return
        os.setresgid(self.user_gid, self.user_gid, 0)
        os.setresuid(self.user_uid, self.user_uid, 0)
        self.dropped = True
    def regain(self):
        """
        Regain root privileges
        """
        if not self.dropped:
            return
        os.setresuid(self.orig_suid, self.orig_suid, self.user_uid)
        os.setresgid(self.orig_sgid, self.orig_sgid, self.user_gid)
        self.dropped = False
    @contextlib.contextmanager
    def root(self):
        """
        Regain root privileges for the duration of this context manager
        """
        if not self.dropped:
            yield
        else:
            self.regain()
            try:
                yield
            finally:
                self.drop()
    @contextlib.contextmanager
    def user(self):
        """
        Drop root privileges for the duration of this context manager
        """
        if self.dropped:
            yield
        else:
            self.drop()
            try:
                yield
            finally:
                self.regain()
privs = ProcessPrivs()
privs.drop()
As soon as this module is loaded, root privileges are dropped, and can be regained for as little as possible using a handy context manager:
   with privs.root():
       subprocess.run(["systemd-run", ...], check=True, capture_output=True)
Using the chroot from test cases The infrastructure to setup and spin down ephemeral machine is relatively simple, once one has worked out the nspawn incantations:
class Chroot:
    """
    Manage an ephemeral chroot
    """
    running_chroots: Dict[str, "Chroot"] =  
    def __init__(self, name: str, chroot_dir: Optional[str] = None):
        self.name = name
        if chroot_dir is None:
            self.chroot_dir = self.get_chroot_dir(name)
        else:
            self.chroot_dir = chroot_dir
        self.machine_name = f"transilience- uuid.uuid4() "
    def start(self):
        """
        Start nspawn on this given chroot.
        The systemd-nspawn command is run contained into its own unit using
        systemd-run
        """
        unit_config = [
            'KillMode=mixed',
            'Type=notify',
            'RestartForceExitStatus=133',
            'SuccessExitStatus=133',
            'Slice=machine.slice',
            'Delegate=yes',
            'TasksMax=16384',
            'WatchdogSec=3min',
        ]
        cmd = ["systemd-run"]
        for c in unit_config:
            cmd.append(f"--property= c ")
        cmd.extend((
            "systemd-nspawn",
            "--quiet",
            "--ephemeral",
            f"--directory= self.chroot_dir ",
            f"--machine= self.machine_name ",
            "--boot",
            "--notify-ready=yes"))
        log.info("%s: starting machine using image %s", self.machine_name, self.chroot_dir)
        log.debug("%s: running %s", self.machine_name, " ".join(shlex.quote(c) for c in cmd))
        with privs.root():
            subprocess.run(cmd, check=True, capture_output=True)
        log.debug("%s: started", self.machine_name)
        self.running_chroots[self.machine_name] = self
    def stop(self):
        """
        Stop the running ephemeral containers
        """
        cmd = ["machinectl", "terminate", self.machine_name]
        log.debug("%s: running %s", self.machine_name, " ".join(shlex.quote(c) for c in cmd))
        with privs.root():
            subprocess.run(cmd, check=True, capture_output=True)
        log.debug("%s: stopped", self.machine_name)
        del self.running_chroots[self.machine_name]
    @classmethod
    def create(cls, chroot_name: str) -> "Chroot":
        """
        Start an ephemeral machine from the given master chroot
        """
        res = cls(chroot_name)
        res.start()
        return res
    @classmethod
    def get_chroot_dir(cls, chroot_name: str):
        """
        Locate a master chroot under test_chroots/
        """
        chroot_dir = os.path.abspath(os.path.join(os.path.dirname(__file__), "..", "test_chroots", chroot_name))
        if not os.path.isdir(chroot_dir):
            raise RuntimeError(f" chroot_dir  does not exists or is not a chroot directory")
        return chroot_dir
# We need to use atextit, because unittest won't run
# tearDown/tearDownClass/tearDownModule methods in case of KeyboardInterrupt
# and we need to make sure to terminate the nspawn containers at exit
@atexit.register
def cleanup():
    # Use a list to prevent changing running_chroots during iteration
    for chroot in list(Chroot.running_chroots.values()):
        chroot.stop()
And here's a TestCase mixin that starts a containerized systems and opens a Mitogen connection to it:
class ChrootTestMixin:
    """
    Mixin to run tests over a setns connection to an ephemeral systemd-nspawn
    container running one of the test chroots
    """
    chroot_name = "buster"
    @classmethod
    def setUpClass(cls):
        super().setUpClass()
        import mitogen
        from transilience.system import Mitogen
        cls.broker = mitogen.master.Broker()
        cls.router = mitogen.master.Router(cls.broker)
        cls.chroot = Chroot.create(cls.chroot_name)
        with privs.root():
            cls.system = Mitogen(
                    cls.chroot.name, "setns", kind="machinectl",
                    python_path="/usr/bin/python3",
                    container=cls.chroot.machine_name, router=cls.router)
    @classmethod
    def tearDownClass(cls):
        super().tearDownClass()
        cls.system.close()
        cls.broker.shutdown()
        cls.chroot.stop()
Running tests Once the tests are set up, everything goes on as normal, except one needs to run nose2 with sudo:
sudo nose2-3
Spin up time for containers is pretty fast, and the tests drop root as soon as possible, and only regain it for as little as needed. Also, dependencies for all this are minimal and available on most systems, and the setup instructions seem pretty straightforward

14 June 2021

Fran ois Marier: Self-hosting an Ikiwiki blog

8.5 years ago, I moved my blog to Ikiwiki and Branchable. It's now time for me to take the next step and host my blog on my own server. This is how I migrated from Branchable to my own Apache server.

Installing Ikiwiki dependencies Here are all of the extra Debian packages I had to install on my server:
apt install ikiwiki ikiwiki-hosting-common gcc libauthen-passphrase-perl libcgi-formbuilder-perl libcrypt-sslauthen-passphrase-perl libcgi-formbuilder-perl libcrypt-ssleay-perl libjson-xs-perl librpc-xml-perl python-docutils libxml-feed-perl libsearch-xapian-perl libmailtools-perl highlight-common libsearch-xapian-perl xapian-omega
apt install --no-install-recommends ikiwiki-hosting-web libgravatar-url-perl libmail-sendmail-perl libcgi-session-perl
apt purge libnet-openid-consumer-perl
Then I enabled the CGI module in Apache:
a2enmod cgi
and un-commented the following in /etc/apache2/mods-available/mime.conf:
AddHandler cgi-script .cgi

Creating a separate user account Since Ikiwiki needs to regenerate my blog whenever a new article is pushed to the git repo or a comment is accepted, I created a restricted user account for it:
adduser blog
adduser blog sshuser
chsh -s /usr/bin/git-shell blog

git setup Thanks to Branchable storing blogs in git repositories, I was able to import my blog using a simple git clone in /home/blog (the srcdir):
git clone --bare git://feedingthecloud.branchable.com/ source.git
Note that the name of the directory (source.git) is important for the ikiwikihosting plugin to work. Then I pulled the .setup file out of the setup branch in that repo and put it in /home/blog/.ikiwiki/FeedingTheCloud.setup. After that, I deleted the setup branch and the origin remote from that clone:
git branch -d setup
git remote rm origin
Following the recommended git configuration, I created a working directory (the repository) for the blog user to modify the blog as needed:
cd /home/blog/
git clone /home/blog/source.git FeedingTheCloud
I added my own ssh public key to /home/blog/.ssh/authorized_keys so that I could push to the srcdir from my laptop. Finaly, I generated a new ssh key without a passphrase:
ssh-keygen -t ed25519
and added it as deploy key to the GitHub repo which acts as a read-only mirror of my blog.

Ikiwiki config While I started with the Branchable setup file, I changed the following things in it:
adminemail: webmaster@fmarier.org
srcdir: /home/blog/FeedingTheCloud
destdir: /var/www/blog
url: https://feeding.cloud.geek.nz
cgiurl: https://feeding.cloud.geek.nz/blog.cgi
cgi_wrapper: /var/www/blog/blog.cgi
cgi_wrappermode: 675
add_plugins:
- goodstuff
- lockedit
- comments
- blogspam
- sidebar
- attachment
- favicon
- format
- highlight
- search
- theme
- moderatedcomments
- flattr
- calendar
- headinganchors
- notifyemail
- anonok
- autoindex
- date
- relativedate
- htmlbalance
- pagestats
- sortnaturally
- ikiwikihosting
- gitpush
- emailauth
disable_plugins:
- brokenlinks
- fortune
- more
- openid
- orphans
- passwordauth
- progress
- recentchanges
- repolist
- toggle
- txt
sslcookie: 1
cookiejar:
  file: /home/blog/.ikiwiki/cookies
useragent: ikiwiki
git_wrapper: /home/blog/source.git/hooks/post-update
urlalias:
- http://feeds.cloud.geek.nz/
- http://www.feeding.cloud.geek.nz/
owner: francois@fmarier.org
hostname: feeding.cloud.geek.nz
emailauth_sender: login@fmarier.org
allowed_attachments: admin()
Then I created the destdir:
mkdir /var/www/blog
chown blog:blog /var/www/blog
and generated the initial copy of the blog as the blog user:
ikiwiki --setup .ikiwiki/FeedingTheCloud.setup --wrappers --rebuild
One thing that failed to generate properly was the tag cloug (from the pagestats plugin). I have not been able to figure out why it fails to generate any output when run this way, but if I push to the repo and let the git hook handle the rebuilding of the wiki, the tag cloud is generated correctly. Consequently, fixing this is not high on my list of priorities, but if you happen to know what the problem is, please reach out.

Apache config Here's the Apache config I put in /etc/apache2/sites-available/blog.conf:
<VirtualHost *:443>
    ServerName feeding.cloud.geek.nz
    SSLEngine On
    SSLCertificateFile /etc/letsencrypt/live/feeding.cloud.geek.nz/fullchain.pem
    SSLCertificateKeyFile /etc/letsencrypt/live/feeding.cloud.geek.nz/privkey.pem
    Header set Strict-Transport-Security: "max-age=63072000; includeSubDomains; preload"
    Include /etc/fmarier-org/blog-common
</VirtualHost>
<VirtualHost *:443>
    ServerName www.feeding.cloud.geek.nz
    ServerAlias feeds.cloud.geek.nz
    SSLEngine On
    SSLCertificateFile /etc/letsencrypt/live/feeding.cloud.geek.nz/fullchain.pem
    SSLCertificateKeyFile /etc/letsencrypt/live/feeding.cloud.geek.nz/privkey.pem
    Redirect permanent / https://feeding.cloud.geek.nz/
</VirtualHost>
<VirtualHost *:80>
    ServerName feeding.cloud.geek.nz
    ServerAlias www.feeding.cloud.geek.nz
    ServerAlias feeds.cloud.geek.nz
    Redirect permanent / https://feeding.cloud.geek.nz/
</VirtualHost>
and the common config I put in /etc/fmarier-org/blog-common:
ServerAdmin webmaster@fmarier.org
DocumentRoot /var/www/blog
LogLevel core:info
CustomLog $ APACHE_LOG_DIR /blog-access.log combined
ErrorLog $ APACHE_LOG_DIR /blog-error.log
AddType application/rss+xml .rss
<Location /blog.cgi>
        Options +ExecCGI
</Location>
before enabling all of this using:
a2ensite blog
apache2ctl configtest
systemctl restart apache2.service
The feeds.cloud.geek.nz domain used to be pointing to Feedburner and so I need to maintain it in order to avoid breaking RSS feeds from folks who added my blog to their reader a long time ago.

Server-side improvements Since I'm now in control of the server configuration, I was able to make several improvements to how my blog is served. First of all, I enabled the HTTP/2 and Brotli modules:
a2enmod http2
a2enmod brotli
and enabled Brotli compression by putting the following in /etc/apache2/conf-available/compression.conf:
<IfModule mod_brotli.c>
  <IfDefine !TRANSFER_COMPRESSION>
    Define TRANSFER_COMPRESSION BROTLI_COMPRESS
  </IfDefine>
</IfModule>
<IfModule mod_deflate.c>
  <IfDefine !TRANSFER_COMPRESSION>
    Define TRANSFER_COMPRESSION DEFLATE
  </IfDefine>
</IfModule>
<IfDefine TRANSFER_COMPRESSION>
  <IfModule mod_filter.c>
    AddOutputFilterByType $ TRANSFER_COMPRESSION  text/html text/plain text/xml text/css text/javascript
    AddOutputFilterByType $ TRANSFER_COMPRESSION  application/x-javascript application/javascript application/ecmascript
    AddOutputFilterByType $ TRANSFER_COMPRESSION  application/rss+xml
    AddOutputFilterByType $ TRANSFER_COMPRESSION  application/xml
  </IfModule>
</IfDefine>
and replacing /etc/apache2/mods-available/deflate.conf with the following:
# Moved to /etc/apache2/conf-available/compression.conf as per https://bugs.debian.org/972632
before enabling this new config:
a2enconf compression
Next, I made my blog available as a Tor onion service by putting the following in /etc/apache2/sites-available/blog.conf:
<VirtualHost *:443>
    ServerName feeding.cloud.geek.nz
    ServerAlias xfdug5vmfi6oh42fp6ahhrqdjcf7ysqat6fkp5dhvde4d7vlkqixrsad.onion
    Header set Onion-Location "http://xfdug5vmfi6oh42fp6ahhrqdjcf7ysqat6fkp5dhvde4d7vlkqixrsad.onion% REQUEST_URI s"
    Header set alt-svc 'h2="xfdug5vmfi6oh42fp6ahhrqdjcf7ysqat6fkp5dhvde4d7vlkqixrsad.onion:443"; ma=315360000; persist=1'
    ... 
<VirtualHost *:80>
    ServerName xfdug5vmfi6oh42fp6ahhrqdjcf7ysqat6fkp5dhvde4d7vlkqixrsad.onion
    Include /etc/fmarier-org/blog-common
</VirtualHost>
Then I followed the Mozilla Observatory recommendations and enabled the following security headers:
Header set Content-Security-Policy: "default-src 'none'; report-uri https://fmarier.report-uri.com/r/d/csp/enforce ; style-src 'self' 'unsafe-inline' ; img-src 'self' https://seccdn.libravatar.org/ ; script-src https://feeding.cloud.geek.nz/ikiwiki/ https://xfdug5vmfi6oh42fp6ahhrqdjcf7ysqat6fkp5dhvde4d7vlkqixrsad.onion/ikiwiki/ http://xfdug5vmfi6oh42fp6ahhrqdjcf7ysqat6fkp5dhvde4d7vlkqixrsad.onion/ikiwiki/ 'unsafe-inline' 'sha256-pA8FbKo4pYLWPDH2YMPqcPMBzbjH/RYj0HlNAHYoYT0=' 'sha256-Kn5E/7OLXYSq+EKMhEBGJMyU6bREA9E8Av9FjqbpGKk=' 'sha256-/BTNlczeBxXOoPvhwvE1ftmxwg9z+WIBJtpk3qe7Pqo=' ; base-uri 'self'; form-action 'self' ; frame-ancestors 'self'"
Header set X-Frame-Options: "SAMEORIGIN"
Header set Referrer-Policy: "same-origin"
Header set X-Content-Type-Options: "nosniff"
Note that the Mozilla Observatory is mistakenly identifying HTTP onion services as insecure, so you can ignore that failure. I also used the Mozilla TLS config generator to improve the TLS config for my server. Then I added security.txt and gpc.json to the root of my git repo and then added the following aliases to put these files in the right place:
Alias /.well-known/gpc.json /var/www/blog/gpc.json
Alias /.well-known/security.txt /var/www/blog/security.txt
I also followed these instructions to create a sitemap for my blog with the following alias:
Alias /sitemap.xml /var/www/blog/sitemap/index.rss
Finally, I simplified a few error pages to save bandwidth:
ErrorDocument 301 " "
ErrorDocument 302 " "
ErrorDocument 404 "Not Found"

Monitoring 404s Another advantage of running my own web server is that I can monitor the 404s easily using logcheck by putting the following in /etc/logcheck/logcheck.logfiles:
/var/log/apache2/blog-error.log 
Based on that, I added a few redirects to point bots and users to the location of my RSS feed:
Redirect permanent /atom /index.atom
Redirect permanent /comments.rss /comments/index.rss
Redirect permanent /comments.atom /comments/index.atom
Redirect permanent /FeedingTheCloud /index.rss
Redirect permanent /feed /index.rss
Redirect permanent /feed/ /index.rss
Redirect permanent /feeds/posts/default /index.rss
Redirect permanent /rss /index.rss
Redirect permanent /rss/ /index.rss
and to tell them to stop trying to fetch obsolete resources:
Redirect gone /~ff/FeedingTheCloud
Redirect gone /gittip_button.png
Redirect gone /ikiwiki.cgi
I also used these 404s to discover a few old Feedburner URLs that I could redirect to the right place using archive.org:
Redirect permanent /feeds/1572545745827565861/comments/default /posts/watch-all-of-your-logs-using-monkeytail/comments.atom
Redirect permanent /feeds/1582328597404141220/comments/default /posts/news-feeds-rssatom-for-mythtvorg-and/comments.atom
...
Redirect permanent /feeds/8490436852808833136/comments/default /posts/recovering-lost-git-commits/comments.atom
Redirect permanent /feeds/963415010433858516/comments/default /posts/debugging-openwrt-routers-by-shipping/comments.atom
I also put the following robots.txt in the git repo in order to stop a bunch of authentication errors coming from crawlers:
User-agent: *
Disallow: /blog.cgi
Disallow: /ikiwiki.cgi

Future improvements There are a few things I'd like to improve on my current setup. The first one is to remove the iwikihosting and gitpush plugins and replace them with a small script which would simply git push to the read-only GitHub mirror. Then I could uninstall the ikiwiki-hosting-common and ikiwiki-hosting-web since that's all I use them for. Next, I would like to have proper support for signed git pushes. At the moment, I have the following in /home/blog/source.git/config:
[receive]
    advertisePushOptions = true
    certNonceSeed = "(random string)"
but I'd like to also reject unsigned pushes. While my blog now has a CSP policy which doesn't rely on unsafe-inline for scripts, it does rely on unsafe-inline for stylesheets. I tried to remove this but the actual calls to allow seemed to be located deep within jQuery and so I gave up. Update: now fixed. Finally, I'd like to figure out a good way to deal with articles which don't currently have comments. At the moment, if you try to subscribe to their comment feed, it returns a 404. For example:
[Sun Jun 06 17:43:12.336350 2021] [core:info] [pid 30591:tid 140253834704640] [client 66.249.66.70:57381] AH00128: File does not exist: /var/www/blog/posts/using-iptables-with-network-manager/comments.atom
This is obviously not ideal since many feed readers will refuse to add a feed which is currently not found even though it could become real in the future. If you know of a way to fix this, please let me know.

20 May 2021

Jonathan McDowell: Losing control to Kubernetes

GMK NucBox Kubernetes is about giving up control. As someone who likes to understand what s going on that s made it hard for me to embrace it. I ve also mostly been able to ignore it, which has helped. However I m aware it s incredibly popular, and there s some infrastructure at work that uses it. While it s not my responsibility I always find having an actual implementation of something is useful in understanding it generally, so I decided it was time to dig in and learn something new. First up, I should say I understand the trade-off here about handing a bunch of decisions off to Kubernetes about the underlying platform allowing development/deployment to concentrate on a nice consistent environment. I get the analogy with the shipping container model where you can abstract out both sides knowing all you have to do is conform to the TEU API. In terms of the underlying concepts I ve got some virtualisation and container experience, so I m not coming at this as a complete newcomer. And I understand multi-site dynamically routed networks. That said, let s start with a basic goal. I d like to understand k8s (see, I can be cool and use the short name) enough to be comfortable with what s going on under the hood and be able to examine a running instance safely (i.e. enough confidence about pulling logs, probing state etc without fearing I might modify state). That ll mean when I come across such infrastructure I have enough tools to be able to hopefully learn from it. To do this I figure I ll need to build myself a cluster and deploy some things on it, then poke it. I ll start by doing so on bare metal; that removes variables around cloud providers and virtualisation and gives me an environment I know is isolated from everything else. I happen to have a GMK NucBox available, so I ll use that. As a first step I m aiming to get a single node cluster deployed running some sort of web accessible service that is visible from the rest of my network. That should mean I ve covered the basics of a Kubernetes install, a running service and actually making it accessible. Of course I m running Debian. I ve got a Bullseye (Debian 11) install - not yet released as stable, but in freeze and therefore not a moving target. I wanted to use packages from Debian as much as possible but it seems that the bits of Kubernetes available in main are mostly just building blocks and not a great starting point for someone new to Kubernetes. So to do the initial install I did the following:
# Install docker + nftables from Debian
apt install docker.io nftables
# Add the Kubernetes repo and signing key
curl -s https://packages.cloud.google.com/apt/doc/apt-key.gpg > /etc/apt/k8s.gpg
cat > /etc/apt/sources.list.d/kubernetes.list <<EOF
deb [signed-by=/etc/apt/k8s.gpg] https://apt.kubernetes.io/ kubernetes-xenial main
EOF
apt update
apt install kubelet kubeadm kubectl
That resulted in a 1.21.1-00 install, which is current at the time of writing. I then used kubeadm to create the cluster:
kubeadm init --apiserver-advertise-address 192.168.53.147 --apiserver-cert-extra-sans udon.mynetwork
The extra parameters were to make the API server externally accessible from the host. I don t know if that was a good idea or not at this stage kubeadm spat out a bunch of instructions but the key piece was about copying the credentials to my user account. So I did:
mkdir ~noodles/.kube
cp -i /etc/kubernetes/admin.conf ~noodles/.kube/config
chown -R noodles ~noodles/.kube/
I then was able to see my pod:
noodles@udon:~$ kubectl get nodes
NAME   STATUS     ROLES                  AGE     VERSION
udon   NotReady   control-plane,master   4m31s   v1.21.1
Ooooh. But why s it NotReady? Seems like it s a networking issue and I need to install a networking provider. The documentation on this is appalling. Flannel gets recommended as a simple option but then turns out to need a --pod-network-cidr option passed to kubeadm and I didn t feel like cleaning up and running again (I ve omitted all the false starts it took me to get to this point). Another pointer was to Weave so I decided to try that with the following magic runes:
mkdir -p /var/lib/weave
head -c 16 /dev/urandom   shasum -a 256   cut -d " " -f1 > /var/lib/weave/weave-passwd
kubectl create secret -n kube-system generic weave-passwd --from-file=/var/lib/weave/weave-passwd
kubectl apply -f "https://cloud.weave.works/k8s/net?k8s-version=$(kubectl version   base64   tr -d '\n')&password-secret=weave-passwd&env.IPALLOC_RANGE=192.168.0.0/24"
(I believe what that s doing is the first 3 lines create a password and store it into the internal Kubernetes config so the weave pod can retrieve it. The final line then grabs a YAML config from Weaveworks to configure up weave. My intention is to delve deeper into what s going on here later; for now the primary purpose is to get up and running.) As I m running a single node cluster I then had to untaint my control node so I could use it as a worker node too:
kubectl taint nodes --all node-role.kubernetes.io/master-
And then:
noodles@udon:~$ kubectl get nodes
NAME   STATUS   ROLES                  AGE   VERSION
udon   Ready    control-plane,master   15m   v1.21.1
Result. What s actually running? Nothing except the actual system stuff, so we need to ask for all namespaces:
noodles@udon:~$ kubectl get pods --all-namespaces
NAMESPACE     NAME                           READY   STATUS    RESTARTS   AGE
kube-system   coredns-558bd4d5db-4nvrg       1/1     Running   0          18m
kube-system   coredns-558bd4d5db-flrfq       1/1     Running   0          18m
kube-system   etcd-udon                      1/1     Running   0          18m
kube-system   kube-apiserver-udon            1/1     Running   0          18m
kube-system   kube-controller-manager-udon   1/1     Running   0          18m
kube-system   kube-proxy-6d8kg               1/1     Running   0          18m
kube-system   kube-scheduler-udon            1/1     Running   0          18m
kube-system   weave-net-mchmg                2/2     Running   1          3m26s
These are all things I m going to have to learn about, but for now I ll nod and smile and pretend I understand. Now I want to actually deploy something to the cluster. I ended up with a simple HTTP echoserver (though it s not entirely clear that s actually the source for what I ended up pulling):
$ kubectl create deployment hello-node --image=k8s.gcr.io/echoserver:1.10
deployment.apps/hello-node created
$ kubectl get pod
NAME                          READY   STATUS    RESTARTS   AGE
hello-node-59bffcc9fd-8hkgb   1/1     Running   0          36s
$ kubectl expose deployment hello-node --type=NodePort --port=8080
$ kubectl get services
NAME         TYPE        CLUSTER-IP      EXTERNAL-IP   PORT(S)          AGE
hello-node   NodePort    10.107.66.138   <none>        8080:31529/TCP   1m
Looks good. And to test locally:
curl http://10.107.66.138:8080/

Hostname: hello-node-59bffcc9fd-8hkgb
Pod Information:
	-no pod information available-
Server values:
	server_version=nginx: 1.13.3 - lua: 10008
Request Information:
	client_address=192.168.53.147
	method=GET
	real path=/
	query=
	request_version=1.1
	request_scheme=http
	request_uri=http://10.107.66.138:8080/
Request Headers:
	accept=*/*
	host=10.107.66.138:8080
	user-agent=curl/7.74.0
Request Body:
	-no body in request-
Neat. But my external network is 192.168.53.0/24 and that s a 10.* address so how do I actually make it visible to other hosts? What I seem to need is an Ingress Controller which provide some sort of proxy between the outside world and pods within the cluster. Let s pick nginx because at least I have some vague familiarity with that and it seems like it should be able to do a bunch of HTTP redirection to different pods depending on the incoming request.
kubectl apply -f https://raw.githubusercontent.com/kubernetes/ingress-nginx/controller-v0.46.0/deploy/static/provider/cloud/deploy.yaml
I then want to expose the hello-node to the outside world and I finally had to write some YAML:
cat > hello-ingress.yaml <<EOF
apiVersion: networking.k8s.io/v1
kind: Ingress
metadata:
  name: example-ingress
  annotations:
    nginx.ingress.kubernetes.io/rewrite-target: /$1
spec:
  rules:
    - host: udon.mynetwork
      http:
        paths:
          - path: /
            pathType: Prefix
            backend:
              service:
                name: hello-node
                port:
                  number: 8080
EOF
i.e. incoming requests to http://udon.mynetwork/ should go to the hello-node on port 8080. I applied this:
$ kubectl apply -f hello-ingress.yaml
ingress.networking.k8s.io/example-ingress created
$ kubectl get ingress
NAME              CLASS    HOSTS            ADDRESS   PORTS   AGE
example-ingress   <none>   udon.mynetwork             80      3m8s
No address? What have I missed? Let s check the nginx service, which apparently lives in the ingress-nginx namespace:
noodles@udon:~$ kubectl get services -n ingress-nginx
NAME                                 TYPE           CLUSTER-IP      EXTERNAL-IP   PORT(S)                    AGE
ingress-nginx-controller             LoadBalancer   10.96.9.41      <pending>     80:32740/TCP,443:30894/TCP 13h
ingress-nginx-controller-admission   ClusterIP      10.111.16.129   <none>        443/TCP                    13h
<pending> does not seem like something I want. Digging around it seems I need to configure the external IP. So I do:
kubectl patch svc ingress-nginx-controller -n ingress-nginx -p \
	' "spec":  "type": "LoadBalancer", "externalIPs":["192.168.53.147"] '
and things look happier:
noodles@udon:~$ kubectl get services -n ingress-nginx
NAME                                 TYPE           CLUSTER-IP      EXTERNAL-IP      PORT(S)                 AGE
ingress-nginx-controller             LoadBalancer   10.96.9.41      192.168.53.147   80:32740/TCP,443:30894/TCP   14h
ingress-nginx-controller-admission   ClusterIP      10.111.16.129   <none>           443/TCP                 14h
noodles@udon:~$ kubectl get ingress
NAME              CLASS    HOSTS           ADDRESS          PORTS   AGE
example-ingress   <none>   udon.mynetwork  192.168.53.147   80      14h
Let s try a curl from a remote host:
curl http://udon.mynetwork/

Hostname: hello-node-59bffcc9fd-8hkgb
Pod Information:
	-no pod information available-
Server values:
	server_version=nginx: 1.13.3 - lua: 10008
Request Information:
	client_address=192.168.0.5
	method=GET
	real path=/
	query=
	request_version=1.1
	request_scheme=http
	request_uri=http://udon.mynetwork:8080/
Request Headers:
	accept=*/*
	host=udon.mynetwork
	user-agent=curl/7.64.0
	x-forwarded-for=192.168.53.136
	x-forwarded-host=udon.mynetwork
	x-forwarded-port=80
	x-forwarded-proto=http
	x-real-ip=192.168.53.136
	x-request-id=6aaef8feaaa4c7d07c60b2d05c45f75c
	x-scheme=http
Request Body:
	-no body in request-
Ok, so that seems like success. I ve got a single node cluster running a single actual application pod (the echoserver) and exporting it to the outside world. That s enough to start poking under the hood. Which is for another post, as this one is already getting longer than I d like. I ll just leave some final thoughts of things I need to work out:

16 May 2021

Carl Chenet: How to save up to 500 /year switching from Mailchimp to Open Source Mailtrain and AWS SES

My newsletter Le Courrier du hacker (3,800 subscribers, 176 issues) is 3 years old and Mailchimp costs were becoming unbearable for a small project ($50 a month, $600 a year), with still limited revenues nowadays. Switching to the Open Source Mailtrain plugged to the AWS Simple Email Service (SES) will dramatically reduce the associated costs. First things first, thanks a lot to Pierre-Gilles Leymarie for his own article about switching to Mailtrain/SES. I owe him (and soon you too) so much. This article will be a step-by-step about how to set up Mailtrain/SES on a dedicated server running Linux. What s the purpose of this article? Mailchimp is more and more expensive following the growth of your newsletter subscribers and you need to leave it. You can use Mailtrain, a web app running on your own server and use the AWS SES service to send emails in an efficient way, avoiding to be flagged as a spammer by the other SMTP servers (very very common, you can try but you have been warned against  Prerequisites You will need the following prerequisites : Steps This is a fairly straightforward setup if you know what you re doing. In the other case, you may need the help of a professional sysadmin. You will need to complete the following steps in order to complete your setup: Configure AWS SES Verify your domain You need to configure the DKIM to certify that the emails sent are indeed from your own domain. DKIM is mandatory, it s the de-facto standard in the mail industry. Ask to verify your domain
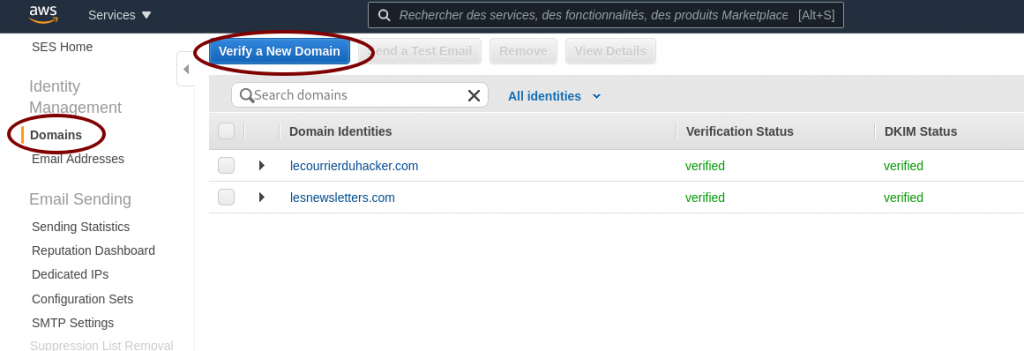
Ask AWS SES to verify a domain
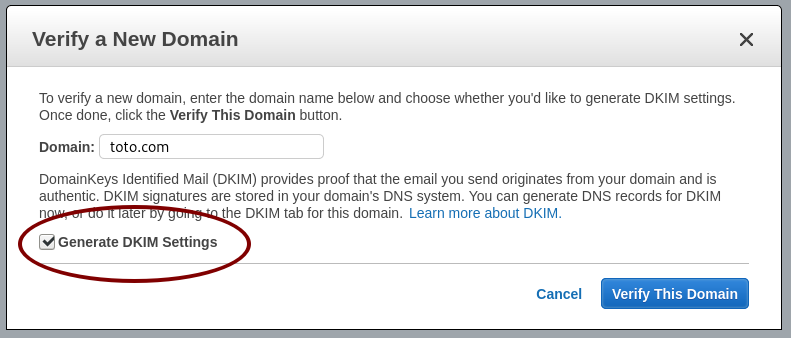
Generate the DKIM settings
Use the DKIM settings
Now you have your DKIM settings and Amazon AWS is waiting for finding the TXT field in your DNS zone. Configure your DNS zone to include DKIM settings I can t be too specific for this section because it varies A LOT depending on your DNS provider. The keys is: as indicated by the previous image you have to create one TXT record and two CNAME records in your DNS zone. The names, the types and the values are indicated by AWS SES. If you don t understand what s going here, there is a high probabiliy you ll need a system administrator to apply these modifications and the next ones in this article. Am I okay for AWS SES ? As long as the word verified does not appear for your domain, as shown in the image below, something is wrong. Don t wait too long, you have a misconfiguration somewhere.
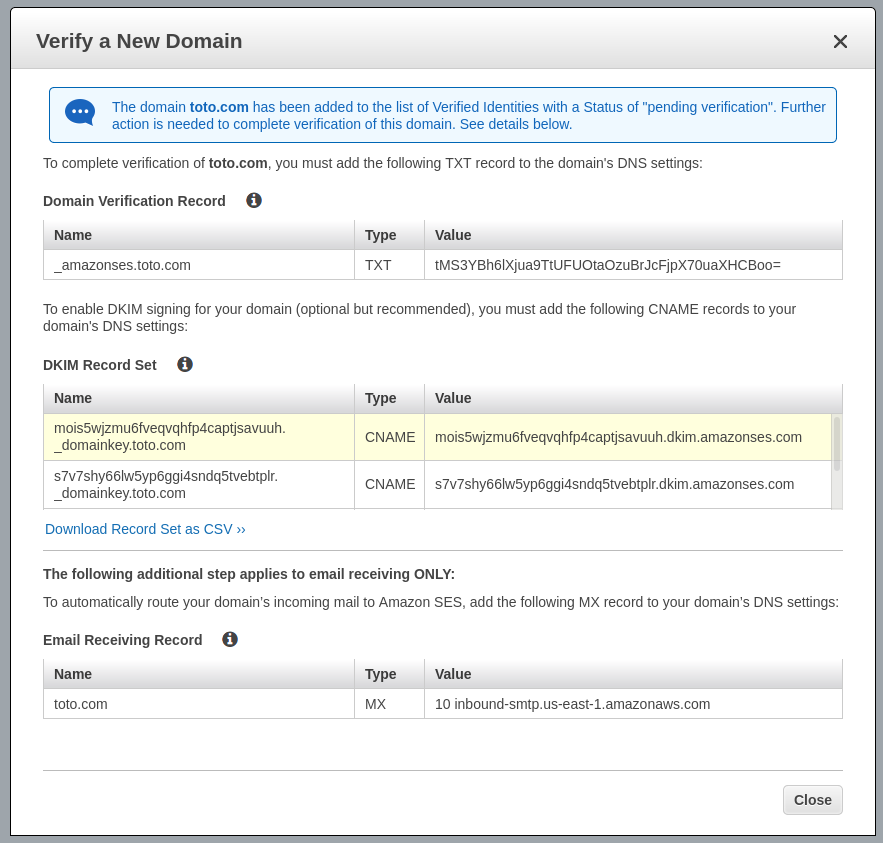
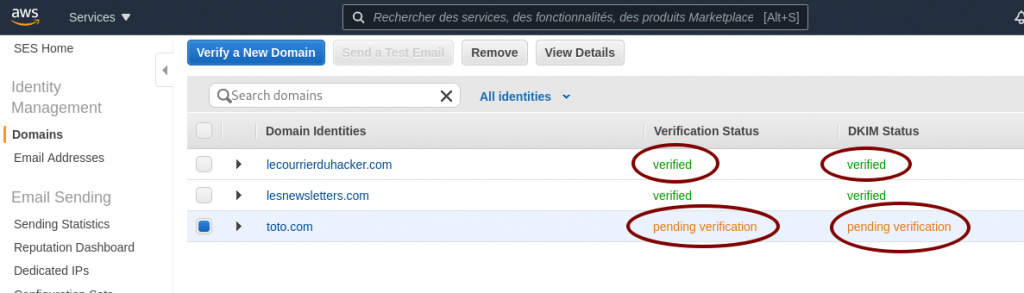
AWS SES pending verification
When your domain is verified, you ll also receive an email to inform you about the successful verification. SMTP settings The last step is generating your credentials to use the AWS SES SMTP server. IT is really straightforward, providing the STMP address to use, the port, and a pair of username/password credentials.
AWS SES SMTP settings and credentials
Just click on Create My SMTP Credentials and follow the instructions. Write the SMTP server address somewhere and store the file with credentials on your computer, we ll need them below. Configure your server As we said before, we need a baremetal server or a virtual machine running a recent Linux. Configure your MySQL/MariaDB database We create a user mailtrain having all rights on a new database mailtrain.
MariaDB [(none)]> create database mailtrain;
Query OK, 1 row affected (0.00 sec)
MariaDB [(none)]> CREATE USER 'mailtrain' IDENTIFIED BY 'V3rYD1fF1cUlTP4sSW0rd!';
Query OK, 0 rows affected (0.01 sec)
MariaDB [(none)]> GRANT ALL PRIVILEGES ON mailtrain.* TO 'mailtrain'@localhost IDENTIFIED BY 'V3rYD1fF1cUlTP4sSW0rd!';
Query OK, 0 rows affected (0.00 sec)
MariaDB [(none)]> FLUSH PRIVILEGES;
Query OK, 0 rows affected (0.00 sec)
MariaDB [(none)]> show databases;
+--------------------+
  Database            
+--------------------+
  information_schema  
  mailtrain           
  mysql               
  performance_schema  
+--------------------+
6 rows in set (0.00 sec)
MariaDB [(none)]> Bye
Configure your web server I use Nginx and I ll give you the complete setup for it, including generating Let s Encrypt. Configure Let s Encrypt You need to stop Nginx as root: systemctl stop nginx Then get the certificate only, I ll give the Nginx Vhost configuration: certbot certonly -d mailtrain.toto.com Install Mailtrain On your server create the following directory: mkdir -p /var/www/
cd /var/www
wget https://github.com/Mailtrain-org/mailtrain/archive/refs/tags/v1.24.1.tar.gz
tar zxvf v1.24.1.tar.gz
Modify the file /var/www/mailtrain/config/production.toml to use the MySQL settings:
[mysql]
host="localhost"
user="mailtrain"
password="V3rYD1ff1culT!"
database="mailtrain"
Now launch the Mailtrain process in a screen:
screen
NODE_ENV=production npm start
Now Mailtrain is launched and should be running. Yeah I know it s ugly to launch like this (root process in a screen, etc) you can improve security with the following commands:
groupadd mailtrain
useradd -g mailtrain
chown -R mailtrain:mailtrain /var/www/mailtrain 
Now create the following file in /etc/systemd/system/mailtrain.service
[Unit]
 Description=mailtrain
 After=network.target
[Service]
 Type=simple
 User=mailtrain
 WorkingDirectory=/var/www/mailtrain/
 Environment="NODE_ENV=production"
 Environment="PORT=3000"
 ExecStart=/usr/bin/npm run start
 TimeoutSec=15
 Restart=always
[Install]
 WantedBy=multi-user.target
To register the following systemd unit and to launch the new Mailtrain daemon, use the following commands (do not forget to kill your screen session if you used it before):
systemctl daemon-reload
systemctl start mailtrain.service
Now Mailtrain is running under the classic user mailtrain of the mailtrain system group. Configure the Nginx Vhost configuration for your domain Here is my configuration for the Mailtrain Nginx Vhost:
map $http_upgrade $connection_upgrade  
  default upgrade;
  ''      close;
 
server  
  listen 80; 
  listen [::]:80;
  server_name mailtrain.toto.com;
  return 301 https://$host$request_uri;
 
server  
  listen 443 ssl;
  listen [::]:443 ssl;
  server_name mailtrain.toto.com;
  access_log /var/log/nginx/mailtrain.toto.com.access.log;
  error_log /var/log/nginx/mailtrain.toto.com.error.log;
  ssl_protocols TLSv1.2;
  ssl_ciphers EECDH+AESGCM:EECDH+AES;
  ssl_ecdh_curve prime256v1;
  ssl_prefer_server_ciphers on; 
  ssl_session_cache shared:SSL:10m;
  ssl_certificate     /etc/letsencrypt/live/mailtrain.toto.com/fullchain.pem;
  ssl_certificate_key /etc/letsencrypt/live/mailtrain.toto.com/privkey.pem;
  keepalive_timeout    70; 
  sendfile             on;
  client_max_body_size 0;
  root /var/www/mailtrain;
  location ~ /\.well-known\/acme-challenge  
    allow all;
   
  gzip on; 
  gzip_disable "msie6";
  gzip_vary on; 
  gzip_proxied any;
  gzip_comp_level 6;
  gzip_buffers 16 8k; 
  gzip_http_version 1.1;
  gzip_types text/plain text/css application/json application/javascript text/xml application/xml application/xml+rss text/javascript;
  add_header Strict-Transport-Security "max-age=31536000";
  location /   
    try_files $uri @proxy;
   
  location @proxy  
    proxy_set_header Host $host;
    proxy_set_header X-Real-IP $remote_addr;
    proxy_set_header X-Forwarded-For $proxy_add_x_forwarded_for;
    proxy_set_header X-Forwarded-Proto https;
    proxy_pass http://127.0.0.1:3000;
   
 
Now Nginx is ready. Just start it:
systemctl start nginx
This Nginx vhost will redirect all http requests coming to the Mailtrain process running on the 3000 port. Now it s time to setup Mailtrain! Setup Mailtrain You should be able to access your Mailtrain at https://mailtrain.toto.com Mailtrain is quite simple to configure, Here is my mailer setup. Mailtrain just forwards emails to AWS SES. We only have to plug Mailtrain to AWS SES.
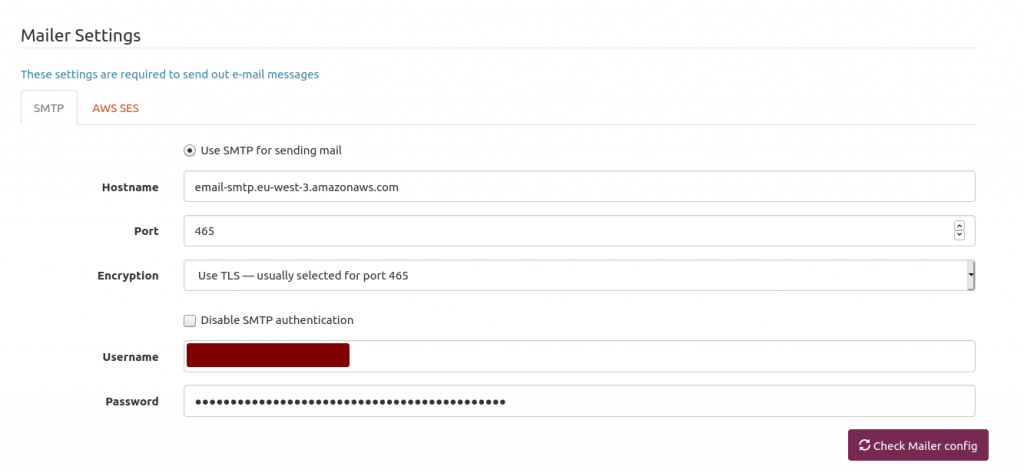
Mailtrain mailer setup
The hostname is provided by AWS SES in the STMP Settings section. Use the 465 port and USE TLS option. Next is providing your AWS SES username and password you generated above and stored somewhere on your computer. One of the issues I encountered is the AWS SES rate limit. Send too many emails too fast will get you flagged as a spammer. So I had to throttle Mailtrain. Because I m a lazy man, I asked Pierre-Gilles Leymarie his setup. Quite easier than determining myself the good one. Here is my setup. Works fine for my soon-to-be 4k subscribers. The idea is: if your AWS SES lets you know you send too fast then just slow down.
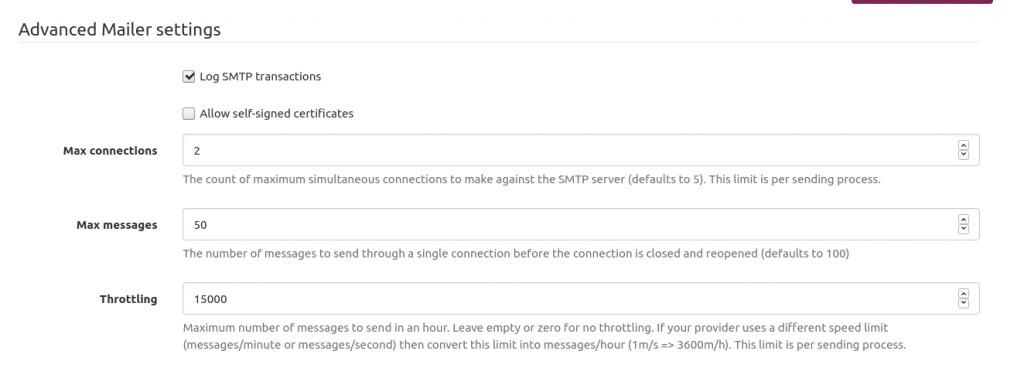
Mailtrain to throttle sending emails to AWS SES
Conclusion That s it! You re ready! Almost. You need an HTML template for your newsletter and a list of subscribers. Buf if you re not new in the newsletter field, fleeing Mailchimp because of their expensive prices, you should have them both already. After sending almost ten issues with this setup, I m really happy with it. Open/click rates are the same. When leaving Mailchimp, do not leave any list of subscribers because they ll charge you $8 for a 0 to 500 contacts, that s crazy expensive! About the author The post How to save up to 500 /year switching from Mailchimp to Open Source Mailtrain and AWS SES appeared first on Carl Chenet's Blog.

Next.

Previous.